Configure your personal workspace so HubSpot works for how you sell. Set working hours, notification preferences, connect your email and calendar, and set up snippets and templates you'll use daily.
Oops! Something went wrong while submitting the form.
Introduction
Your first day using HubSpot as a sales rep should take about 30 minutes of setup before you're fully operational. This chapter walks you through the five essential configurations that enable you to book meetings, send tracked emails, and work efficiently from day one.
The order matters. Working hours must be set before your meeting link, because your meeting link uses those hours to show availability. Your calendar must be connected before the meeting link works. Your email must be connected before you can use snippets and templates effectively.
By the end of this setup, you will be able to:
Have prospects book meetings directly into your calendar
Send emails that automatically log to contact records
Access HubSpot tools from your inbox without switching tabs
Use pre-written text blocks to speed up your communication
Working hours define when you're available for meetings and calls. HubSpot uses this information in two ways: it controls which time slots appear on your meeting links, and it determines how you're included in round robin routing.
Why this matters: If you don't set working hours, HubSpot assumes you're available 24/7. Your meeting link will show slots at 6am or 10pm. Round robin will route leads to you when you're not working.
Access your profile preferences
Navigate to your profile settings by clicking your profile icon in the top right corner, then select Profile & Preferences.
Scroll down and select "Edit working hours"
Check your time zone
Before configuring working hours, confirm your time zone is set correctly. You'll find this setting on the same Profile & Preferences page.
By default, HubSpot can update your time zone based on your device location. If your working hours aren't editable, it's usually because no time zone is selected. To fix this:
Unselect "Update time zone based on device location"
Manually select your time zone
Re-enable "Update time zone based on device location"
This forces HubSpot to register your time zone, after which you can edit your working hours.
Configure your working hours
Under the Working hours section, you'll see a weekly calendar. Click to set your available hours for each day.
You can set multiple time blocks per day, and different hours for different days. Click + Add working hours to add additional blocks.
What working hours are for (and what they're not for)
Think of working hours as the base layer of your availability. These should reflect the times you're structurally working, not temporary blocks or buffer time between meetings.
Use working hours for:
Your standard work schedule (e.g., 09:00-17:00, Monday to Friday)
Recurring personal commitments that aren't calendar events (e.g., walking the dog every morning)
Lunch breaks you want to protect every day
Days you structurally don't work or take no meetings
Regular evening availability for calls with other time zones
Don't use working hours for:
Buffer time between meetings (configure this in your meeting link settings)
One-off appointments (put these in your calendar, which we'll connect in Section 2)
Temporary schedule changes (use out of office for these)
HubSpot layers multiple settings on top of each other. Working hours is the foundation. Your calendar blocks out specific appointments. Meeting link settings add buffer time and minimum notice. Each layer refines your availability further.
Examples of working hours configurations
Here's how I've configured my own working hours, followed by other common patterns.
Example 1: Protecting your morning routine
I walk my dog every morning from 08:30-09:00. I'm happy to take calls before that walk (headphones in, at my desk), so I set my availability to start at 08:00.
Set two blocks:
Mon-Fri: 08:00-08:30
Mon-Fri: 09:00-17:00
Remember, you're setting when you are available, not when you're blocked. The gap between 08:30 and 09:00 means no one can book me during my dog walk.
Example 2: Protecting a focus day
Monday is my strategy day. I don't want meetings during the day, but I'm happy to take client calls at the end of the day.
Set Monday separately:
Monday: 16:00-17:30
Now Monday is blocked except for a 90-minute window for client calls.
Example 3: Daddy day (or any regular day off)
If you don't work on a specific day each week, simply don't add any working hours for that day. In my case, Wednesday is my day off. It won't appear as available on meeting links, and round robin won't route leads to you on that day.
Example 4: Protecting your lunch break
You want to keep 12:30-13:30 free every day. Instead of one block per day, create two:
Mon-Fri: 09:00-12:30
Mon-Fri: 13:30-17:00
Example 5: Evening availability for international calls
You work with clients in the US and want to offer some evening slots. Add an additional block:
Mon-Fri: 09:00-17:00
Tue & Thu: 19:00-20:30
Now you have evening availability on Tuesdays and Thursdays only.
Your situation will be different, so feel free to play around with these settings. The key is to set your structural availability here, not one-off appointments. If you have a dentist visit next Thursday at 15:00, don't adjust your working hours. Put it in your calendar, and HubSpot will automatically block that slot once your calendar is connected (covered in Section 2).
Setting out of office
Below your working hours, you'll find the out of office setting. Use this for:
Annual leave
Bank holidays
Give each period an event name (e.g., "Christmas") and set the date range.
When you set out of office, HubSpot automatically:
Removes those slots from your meeting links
Excludes you from round robin during that period
Shows your status as away to colleagues
You can also connect your calendar to sync out of office dates automatically (you'll see a Calendar sync option below the out of office settings). I prefer managing out of office directly in my calendar because it's more dynamic and easier to manage alongside other appointments. The HubSpot out of office setting works well for planned leave you want to set in advance, particularly if you want to ensure you're excluded from round robin routing during that period.
Let's connect your calendar to make this dynamic!
Connect calendar
Calendar and meeting link
Your meeting link eliminates the back-and-forth of scheduling. Instead of "Are you free Tuesday?" followed by "Actually, Wednesday works better", you send a link. The prospect picks a time that works for them. Done.
For this to work, HubSpot needs access to your calendar. It combines multiple layers to determine your true availability.
How the availability layers work
When someone opens your meeting link, HubSpot checks four layers in this order:
Meeting link settings: The availability window you set for this specific link (e.g., afternoons only)
Working hours: Your structural availability from your profile preferences
Business calendar: Your work appointments block those times
Personal calendar: Your personal appointments block those times (if connected)
Only times that pass through all four layers appear as available. This means you set things up once, keep your calendars up to date, and your meeting links always show accurate availability.
Connect your business calendar
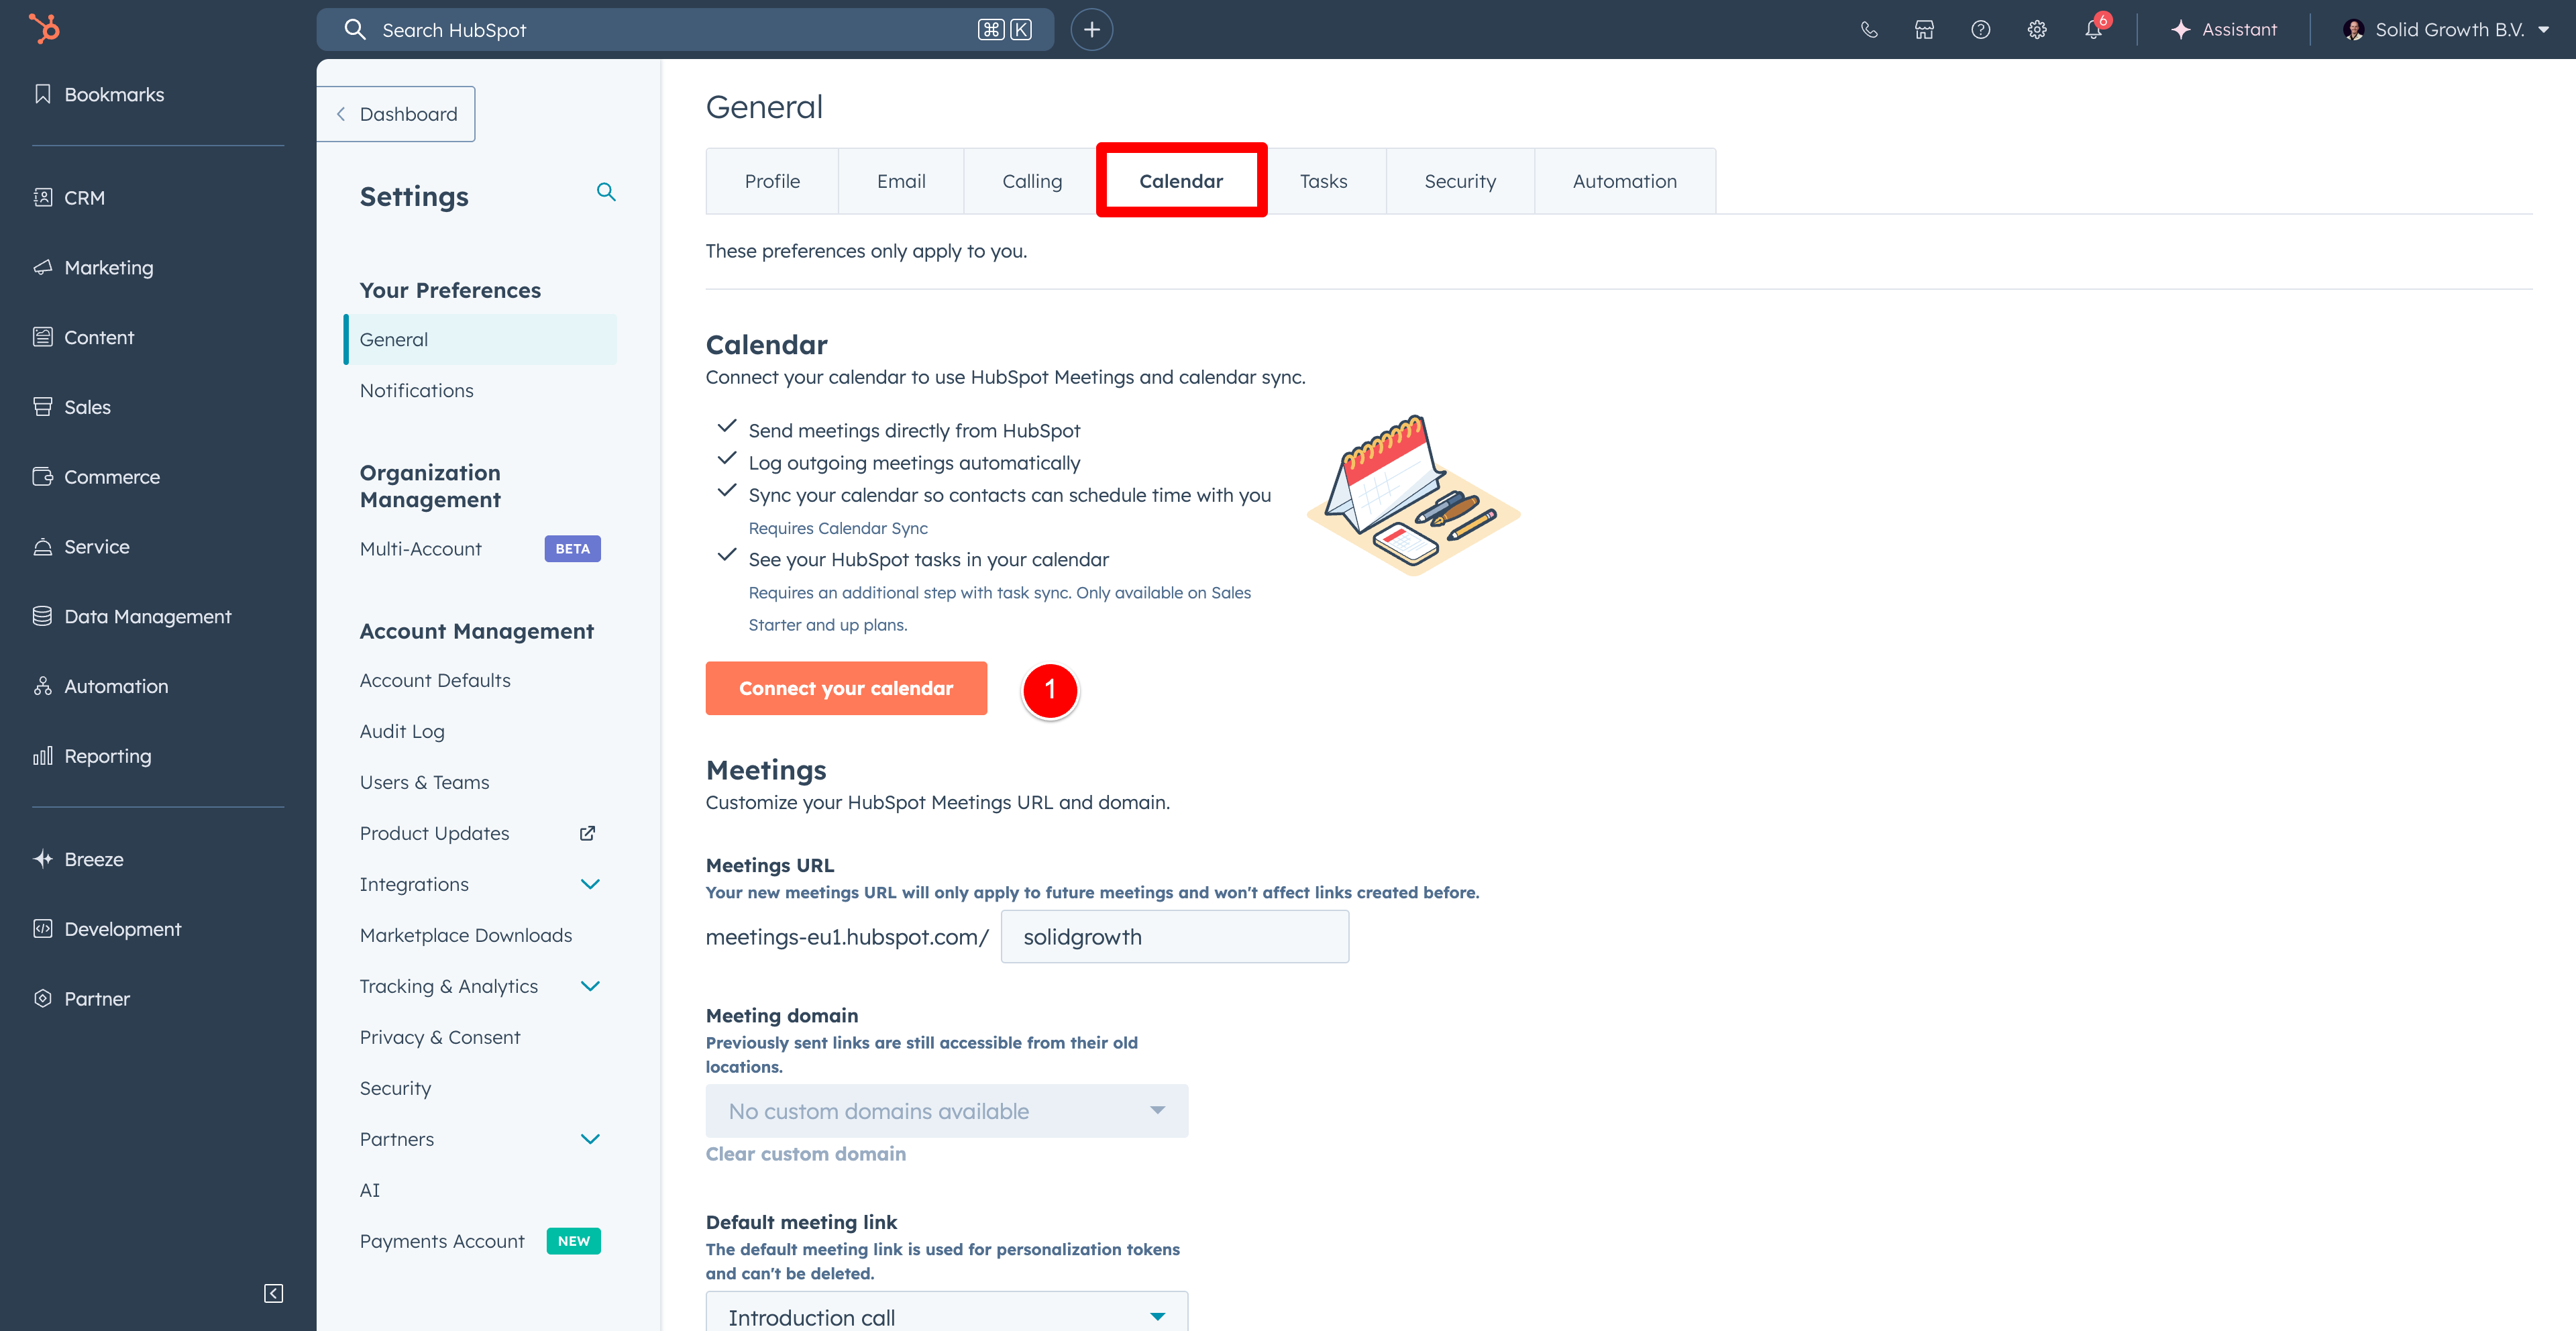
Navigate to Settings (the cog icon in the top right), then select General from the left sidebar. Click the Calendar tab.
Click Connect your calendar and select your provider (Google Calendar, Outlook, or Exchange).
Follow the authentication steps to grant HubSpot access.
Once connected, you'll see your account listed at the top with a green "Connected" status. HubSpot can now see your work appointments and will automatically block those times on your meeting links.
Connect your personal calendar
Your business calendar is connected, but what about personal appointments? If you have a dentist appointment in your personal calendar, HubSpot won't know about it unless you connect that calendar too.
The trick is that HubSpot can only see calendars that your business email has access to. So you need to share your personal calendar with your business email first.
Step 1: Share your personal calendar with your business email
Open your personal calendar (in this example, Google Calendar for a personal Gmail account). Go to Settings and find your personal calendar in the left sidebar.
Click Add people and groups and enter your business email address. For permissions, you can choose:
See only free/busy (hide details) if you want maximum privacy
See all event details if you don't mind your business account seeing appointment names
Make changes and manage sharing if you want full access
I use "Make changes and manage sharing" because it's my own calendar, but "See only free/busy" works perfectly if you just want HubSpot to know you're unavailable without revealing details.
Step 2: Add the personal calendar to your business account
Now switch to your business Google Calendar. Go to Settings, then Add calendar > Subscribe to calendar.
Search for your personal email address and click on it to add the calendar.
Your personal calendar now appears in your business Google Calendar as a secondary calendar.
Step 3: Select the calendar in HubSpot
Return to HubSpot and go to Settings > General > Calendar. Under Availability Calendars, click the dropdown. You should now see your personal calendar as an option.
Select your personal calendar to include it in availability checking.
Important: Your colleagues cannot see your personal calendar. They don't have access to it. But HubSpot can see that you're unavailable during those times, which is exactly what you want. Your dentist appointment blocks that slot on your meeting link, but nobody sees "Dentist - Dr. Smith" in your calendar.
Personal meeting link
Now that your calendars are connected, you can create a scheduling page. Navigate to Library in the left sidebar, then select Meeting scheduler.
Click Create scheduling page and select One-on-one. This is your personal meeting link for one person booking time with you.
Schedule page link
By default, your meeting link uses a HubSpot URL like meetings-eu1.hubspot.com/yourname. On certain paid plans, you can customise this to your own domain. For now, the default works fine.
Schedule tab
Internal name: What you see when inserting the link into an email. Use descriptive names like "30-minute intro call" so you can quickly find the right link.
Event title: What appears in the calendar invite. I use "Call with Solid Growth".
Location: Select your video conferencing tool. Click "Manage extensions" to automatically add a video link.
Cancel and reschedule: Toggle this on. Prospects can modify their booking instead of just not showing up.
Scheduling title: What the prospect sees above the calendar. I use "Book a time to chat".
Duration options: You can offer multiple durations. I offer 15, 30, and 45 minutes so people can choose what they need.
Time zone: Your availability is based on your time zone, but the booking page shows times in the prospect's time zone automatically.
Availability window and working hours
This is where the layers come together. You can restrict this specific meeting link to certain times using the Availability window.
For example, I want to offer intro calls in the afternoon only, so I set my availability window to 14:00-18:00. But my working hours (set in my profile) end at 17:30. What happens?
HubSpot uses whichever is more restrictive. So even though the meeting link says 18:00, the latest available slot respects my 17:30 working hours.
Example: Adding evening availability
Let's say you want to offer calls on Wednesday evenings for prospects in different time zones. You add 18:00-20:00 to your availability window for this meeting link.
But when you check the booking page, no evening slots appear. Why?
Your working hours don't include Wednesday evenings. The availability window can only narrow your availability, not expand it beyond your working hours.
To enable evening slots:
Go back to your profile preferences
Add Wednesday 18:00-20:00 to your working hours
Now those slots appear on this meeting link
Toggle Consider working hours to keep your working hours as the foundation. If you turn this off, you can set completely custom availability, but I recommend keeping it on for consistency.
Additional settings
Image: Choose organiser avatar, company avatar, or a custom image. I use organiser avatar so prospects see who they're booking with.
When a meeting can be scheduled: I use "Over a period of rolling time" set to 2 weeks. Any further out and priorities change or people forget.
Minimum notice time: How much warning you need before a meeting. This depends on the meeting type:
Internal meetings with colleagues: 0 or 15 minutes (they can book immediately)
Client troubleshooting calls: 2 hours (gives you time to prepare)
External intro calls: 4-12 hours (prevents being caught off guard)
Buffer time: Time blocked after each meeting. I set 15 minutes so I can finish notes before the next call starts.
Start time increment: Controls which times appear. I use 30 minutes unless offering 15-minute meetings.
Form tab
By default, HubSpot asks for first name, last name, and email. I usually leave it at that.
Two settings worth noting:
Allow guests: Toggle on if the person booking can add colleagues.
CAPTCHA: Add this if you share the link externally to prevent spam bookings.
Emails & inbox
The next step to get operational as a sales rep is connecting your email. Once this is done, you can send emails from HubSpot that appear to come from your normal work address, track when prospects open your emails, and use templates to speed up repetitive messages.
There are two parts to this: connecting your inbox (so HubSpot can send and log emails) and installing the browser extension (so you can access HubSpot tools directly from Gmail or Outlook).
Connect your personal inbox
Navigate to Settings (cog icon), then General, then click the Email tab.
Click Connect personal email. Select your email provider (Gmail, Outlook, or Office 365) and follow the authentication steps to grant HubSpot access.
Once connected, you can send emails directly from any contact record in HubSpot, and those emails will appear to come from your normal work email address. Recipients won't know the difference.
Enable inbox automation
Before completing the connection, you'll see an option to enable Inbox automation. Toggle this on.
This uses AI to process data from email signatures and metadata. When someone emails you, HubSpot can automatically extract their phone number, job title, and company from their signature and add it to their contact record. It saves manual data entry and keeps your CRM up to date.
Configure your never log list
Once your inbox is connected, scroll down to the Never log section.
This is where you tell HubSpot which emails should NOT be saved to your CRM. By default, every email you send gets logged. But you don't want internal emails to colleagues cluttering up contact records.
Add your company's email domain (e.g., yourdomain.com) to the never log list. Now when you email a colleague, it won't be logged to HubSpot.
You also have a personal never log list for specific email addresses you want to exclude.
Your admin can set a global never log list that applies to all users in your HubSpot account. Check with them to see what's already configured so you don't duplicate effort.
Install the browser extension
The extension brings HubSpot into your inbox. Instead of switching between Gmail and HubSpot, you can access HubSpot's sales tools directly while composing emails.
From the same Email settings page, click Install the extension.
For Gmail, this installs a Chrome extension. For Outlook, you'll install an add-in. Follow the installation steps for your browser.
Once installed, you'll see a HubSpot toolbar when composing emails:
This is a newsletter I am responding to, so I don't share PII, but it's not a real example.
Log: Toggle whether this specific email gets logged to HubSpot. When logging, you can choose which records to associate it with (contact, company, deal).
Track: Toggle whether you want to see when the recipient opens the email. Useful for knowing when to follow up.
Templates: Insert pre-written email templates with one click.
Meetings: Insert your meeting link directly into the email.
I work primarily from my inbox rather than from HubSpot itself. The extension means I don't have to change how I work - I just get HubSpot's tools where I already am.
Conclusion
You've now configured the essentials for working as a sales rep in HubSpot:
Working hours define when you're available, including time blocks for focus days, lunch breaks, and out of office periods
Calendar connection syncs your business and personal calendars so your availability is always accurate
Meeting link lets prospects book time with you without the back-and-forth of scheduling emails
Email connection logs your communication to contact records and gives you HubSpot tools directly in your inbox
These four settings work together. When a prospect clicks your meeting link, HubSpot checks your working hours, scans both calendars for conflicts, applies your buffer time and minimum notice settings, and shows only the slots where you're genuinely available. When you send an email, it automatically logs to the right contact record unless it's to a colleague on your never log list.
From here, you're ready to start selling. Prospects can book meetings, your emails are tracked, and your availability stays accurate without manual updates.
Build your product library with accurate pricing, create quote templates that look professional, configure payment integration, and set up e-signature workflows that eliminate printing and scanning.
Define pipeline progression steps to standardise how reps advance opportunities and give managers visibility into where deals stall or convert unexpectedly.
Configure your personal workspace so HubSpot works for how you sell. Set working hours, notification preferences, connect your email and calendar, and set up snippets and templates you'll use daily.
By clicking “Accept All Cookies”, you agree to the storing of cookies on your device to enhance site navigation, analyze site usage, and assist in our marketing efforts. View our Privacy Policy for more information.


.png)


.png)


.png)


.png)


