Oops! Something went wrong while submitting the form.
Introduction
I am no technical SEO wizard, and you do not need to be one either. Most organic traffic gains come from a handful of marketer-friendly tasks that you can handle inside your CMS. Clear metadata, smart internal links, and a sprinkle of structured data give crawlers and AI tools exactly what they need. If a quick code tweak helps, I will share the snippet so you can copy and paste it without opening a terminal.
This chapter works from easiest to hardest. First, you will add or tune title tags, meta descriptions, and Open Graph tags. Next, you will weave internal links that connect new articles to pillar pages and revive older posts. Then we will drop in basic JSON-LD schema and an llms.txt file so AI crawlers know which pages to quote. Finally, you will run a short technical checklist speed, HTTPS, and sitemap to be sure nothing blocks performance.
Follow the steps in order. Each one pushes your high-quality content higher in Google, Bing, and the new wave of AI answers. No Python required and no marketing hype, just a practical checklist that works.
The title tag and meta description create your first impression. Readers use them to judge whether the page sounds useful, and search engines use them to understand the topic.
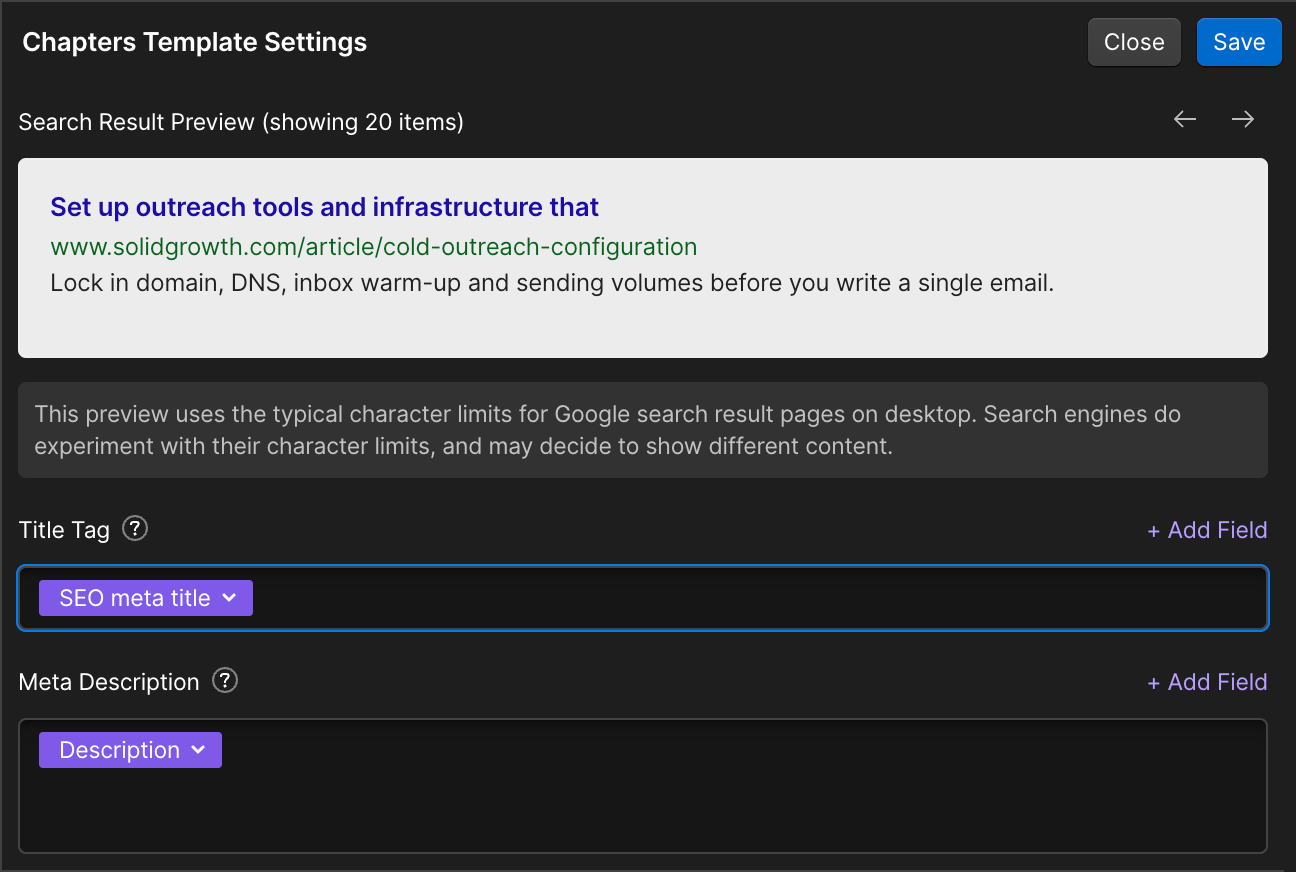
Let me show you an example of lots of generic sounding title & description combinations:
They all have the same title, so how would you decide which one to click on? This is an opportunity to improve the meta title and description. This is just like an ad on LinkedIn or Google and you should definitly optimise this text.
A better title earns attention, a clear description confirms relevance, and together they improve click-through without any extra backlinks or keyword tweaks. This takes only a few minutes, but it could drive WAY more traffic from the content you've already created. It's a high-leverage tactic. So let's start adding a great one.
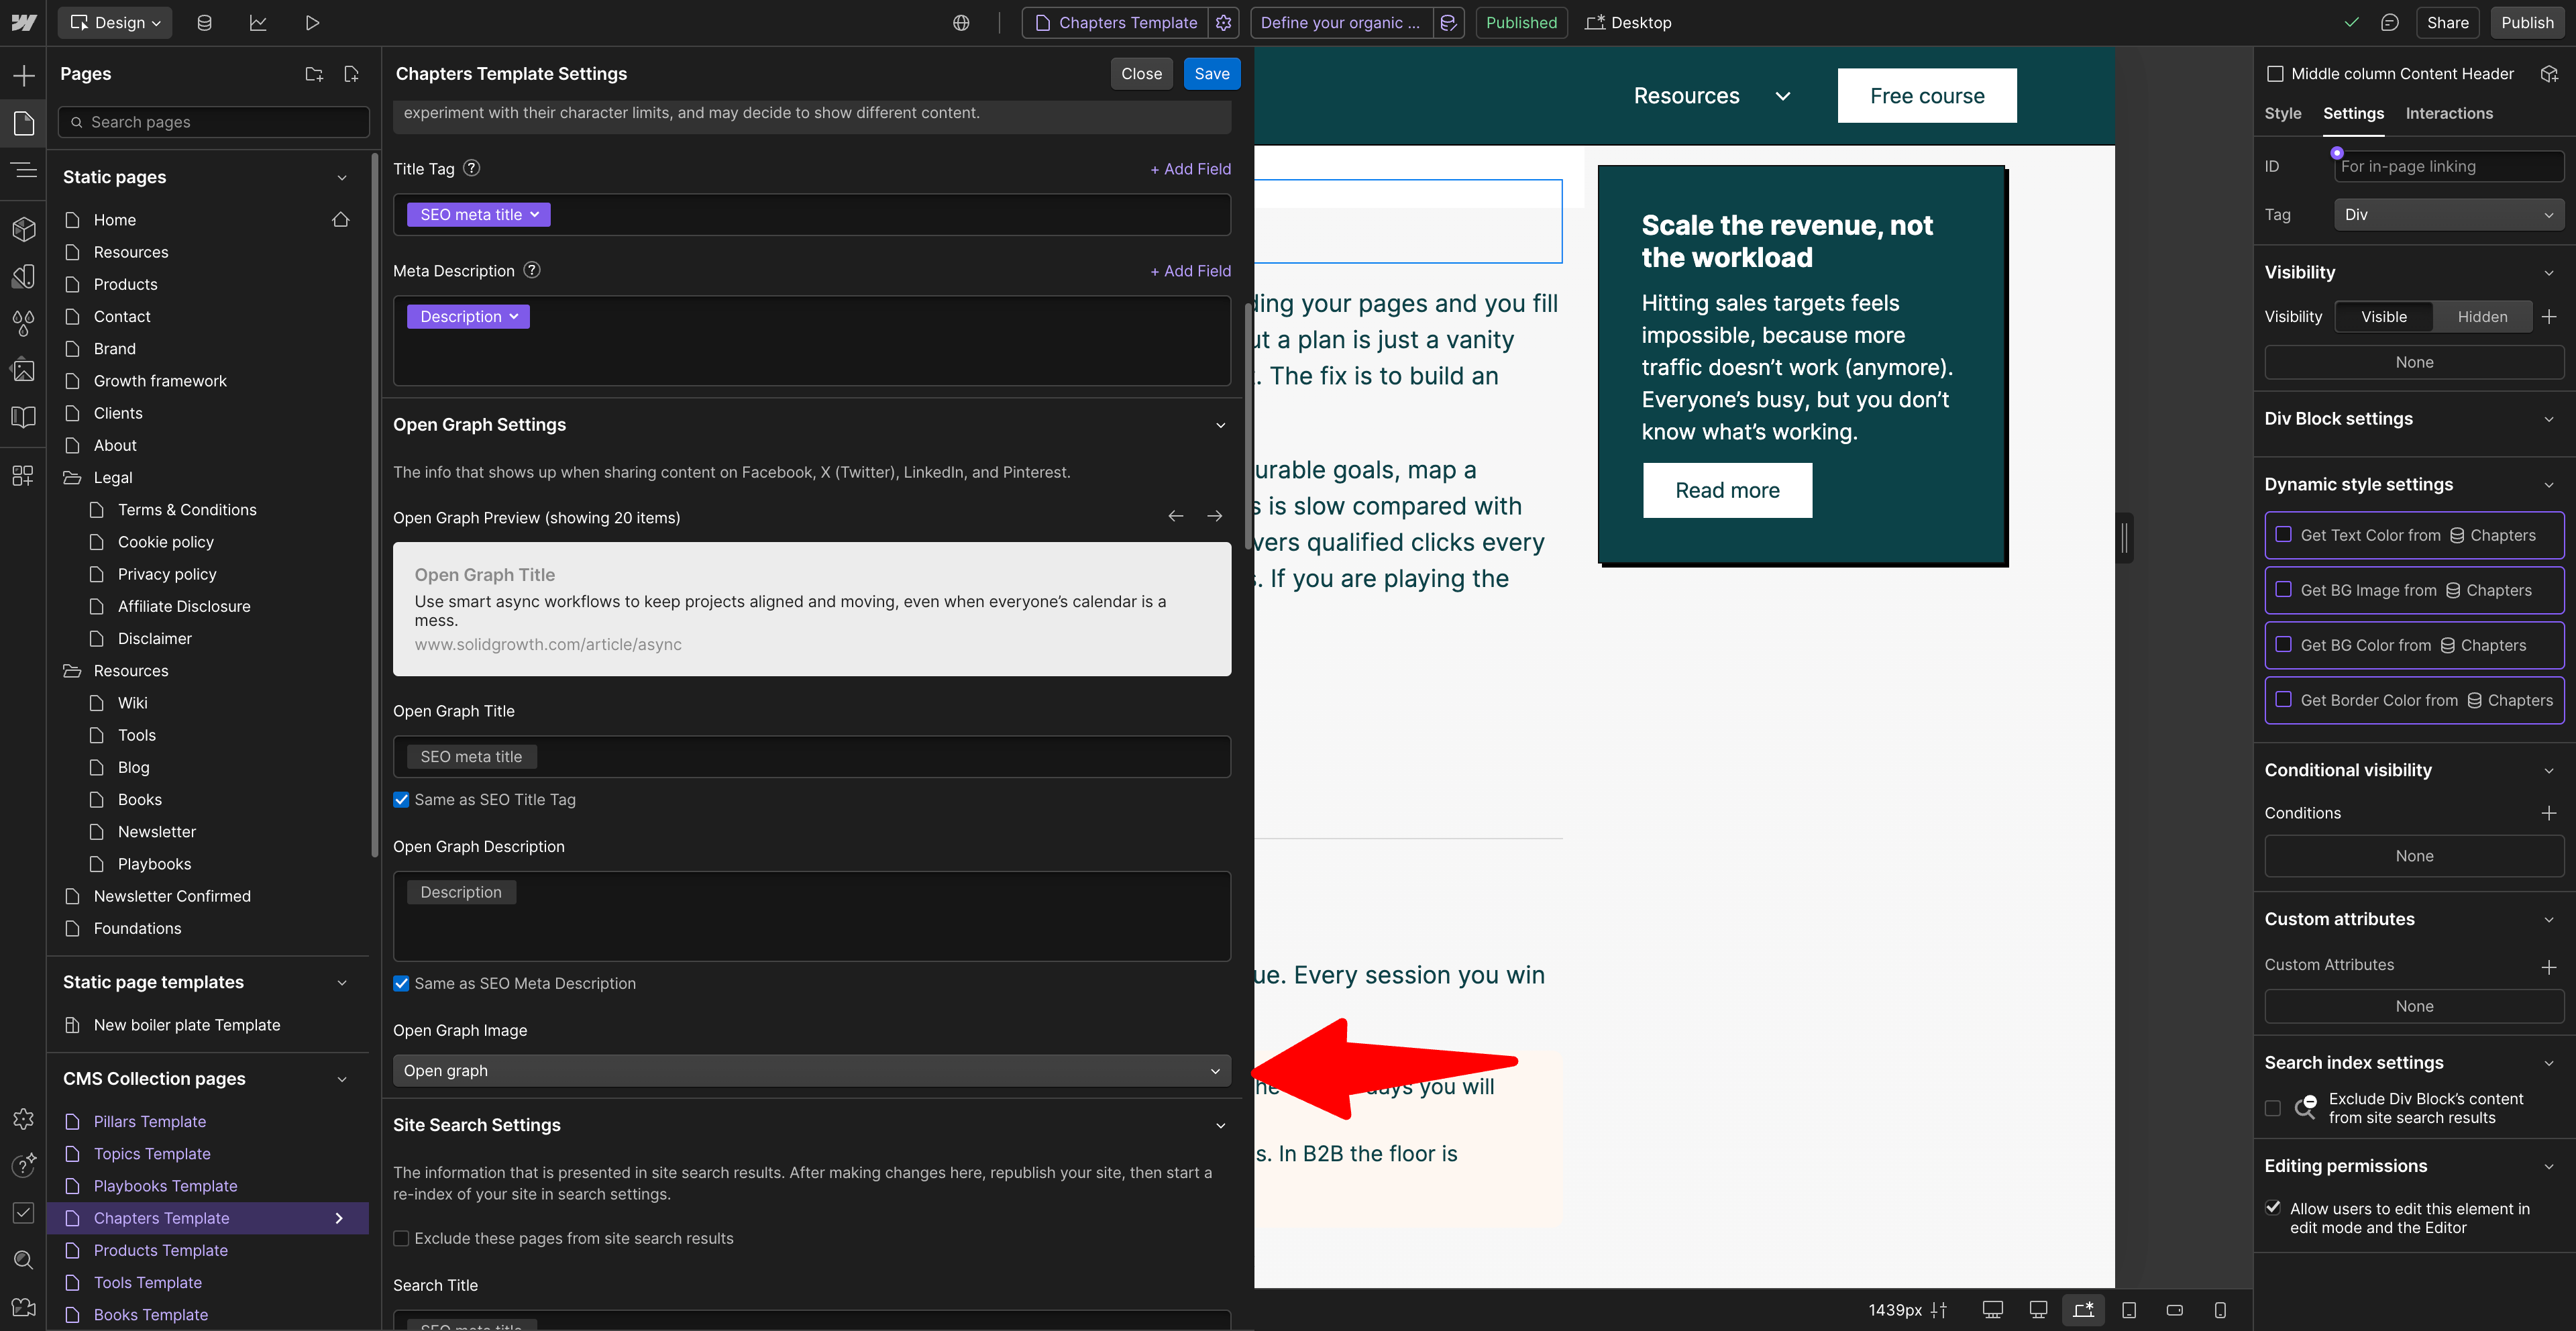
Where to add them in Webflow
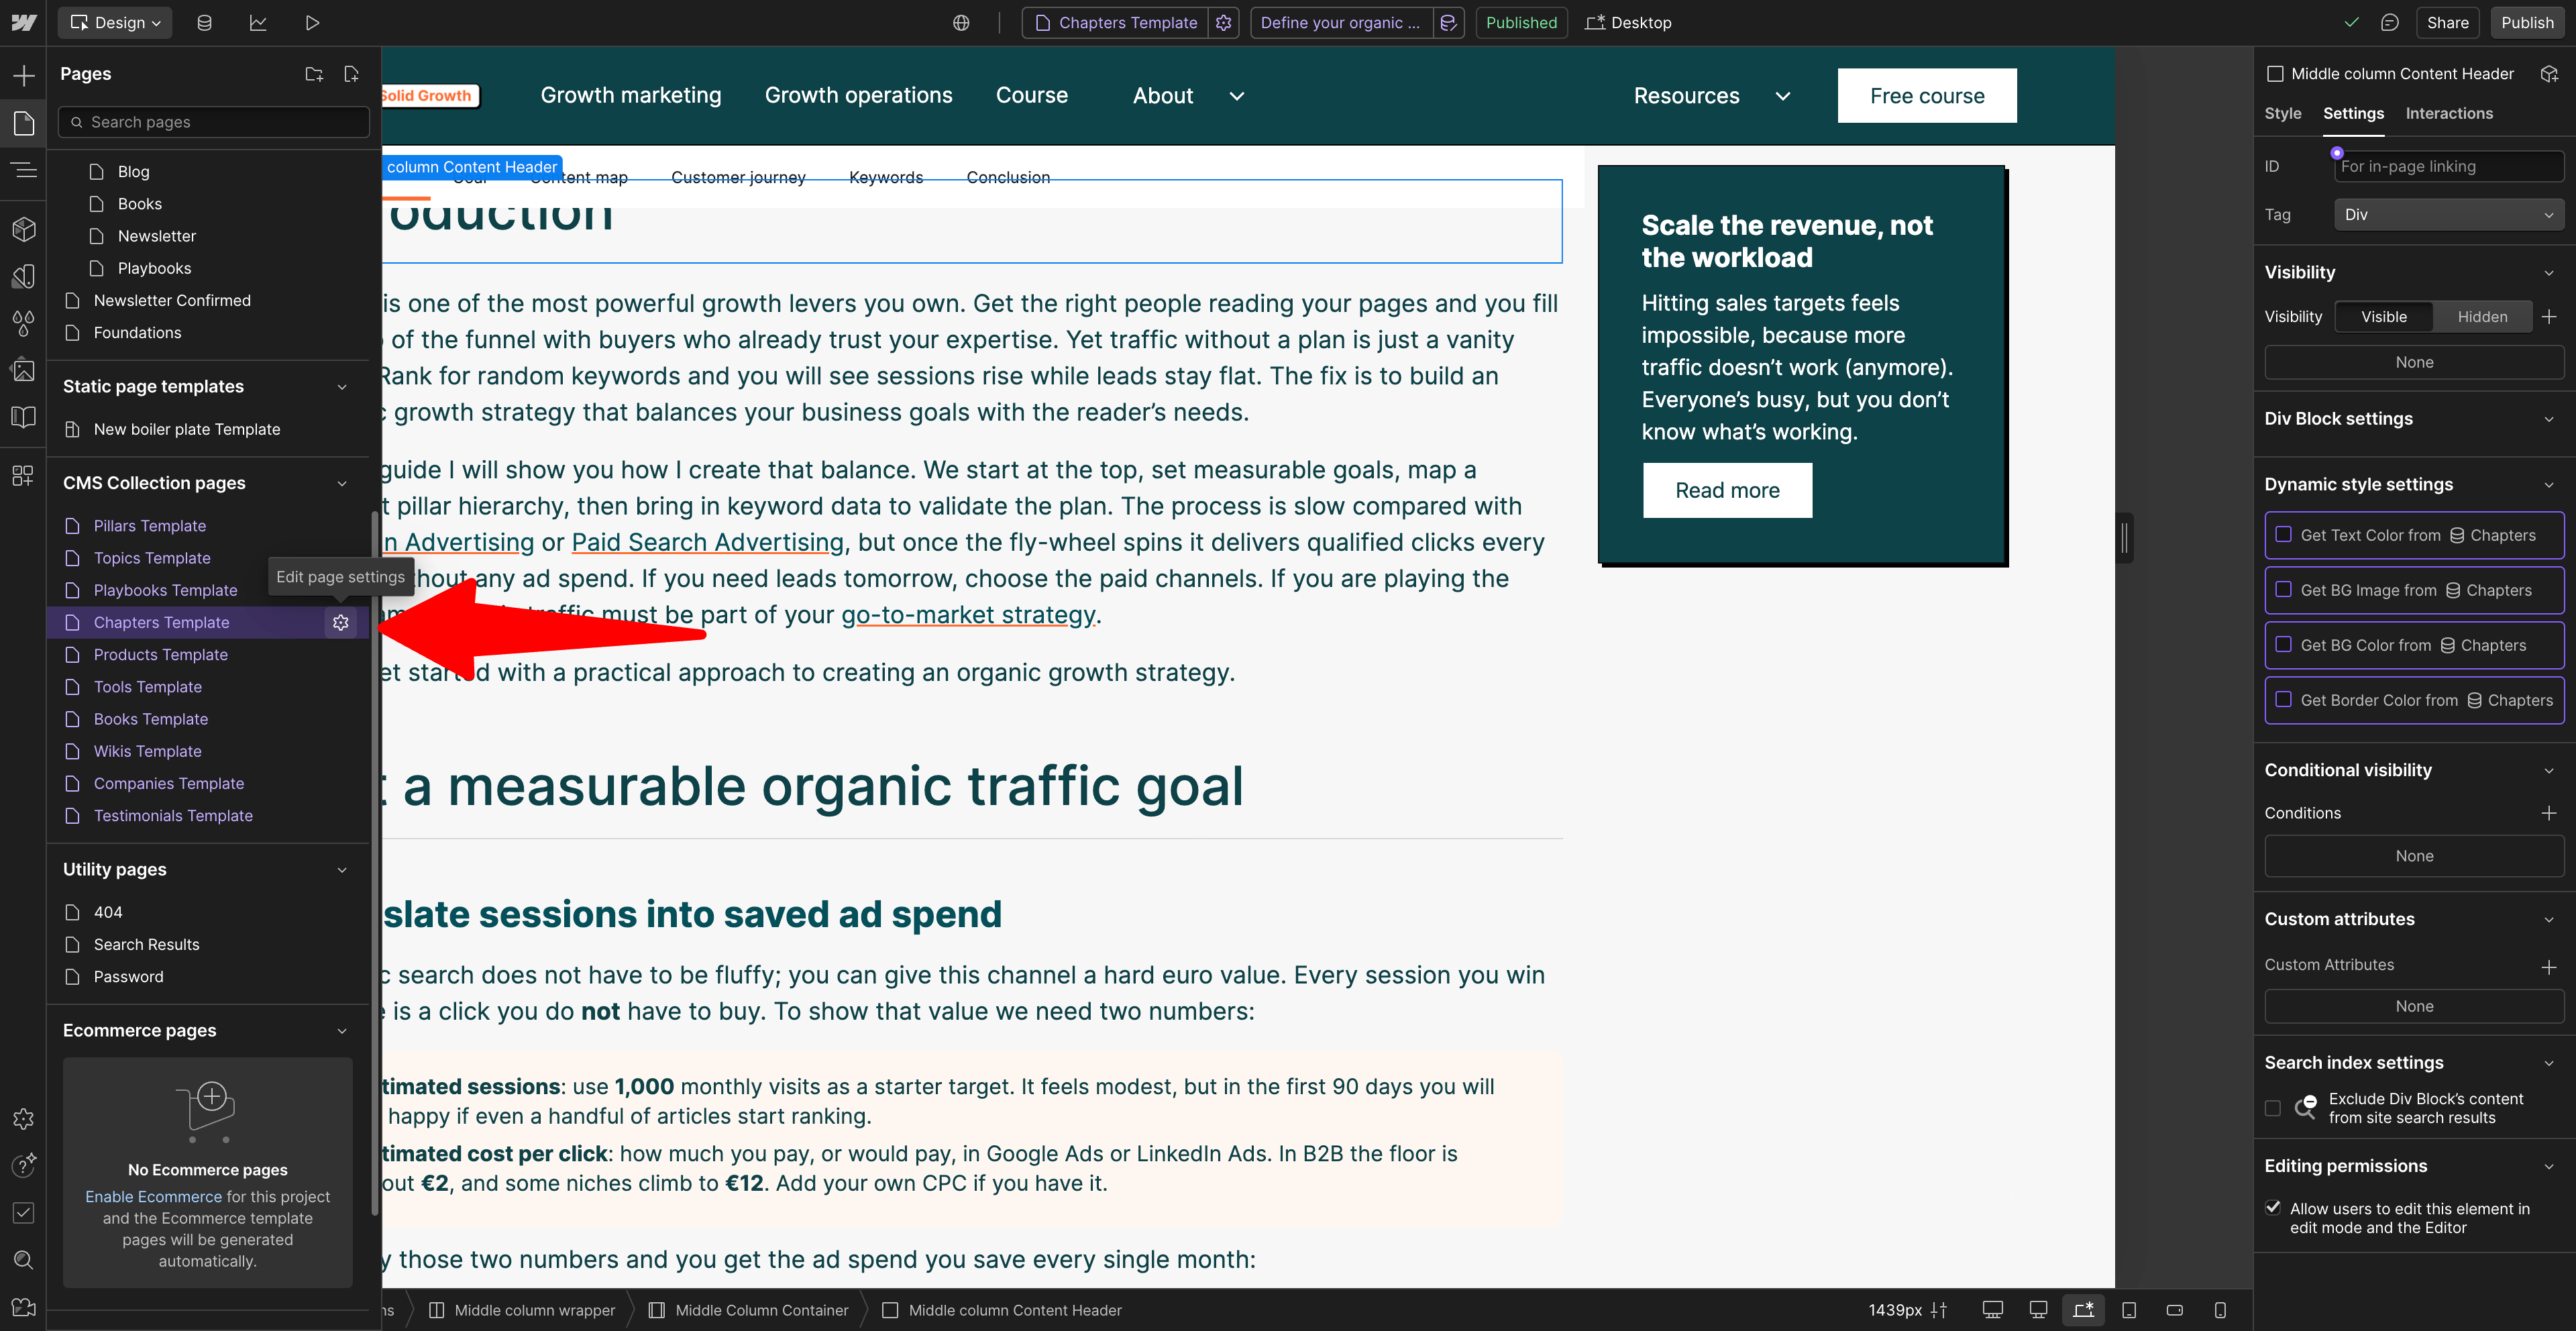
When you hover over a page or a page template, you will see the 'edit page settings', like in this print screen.
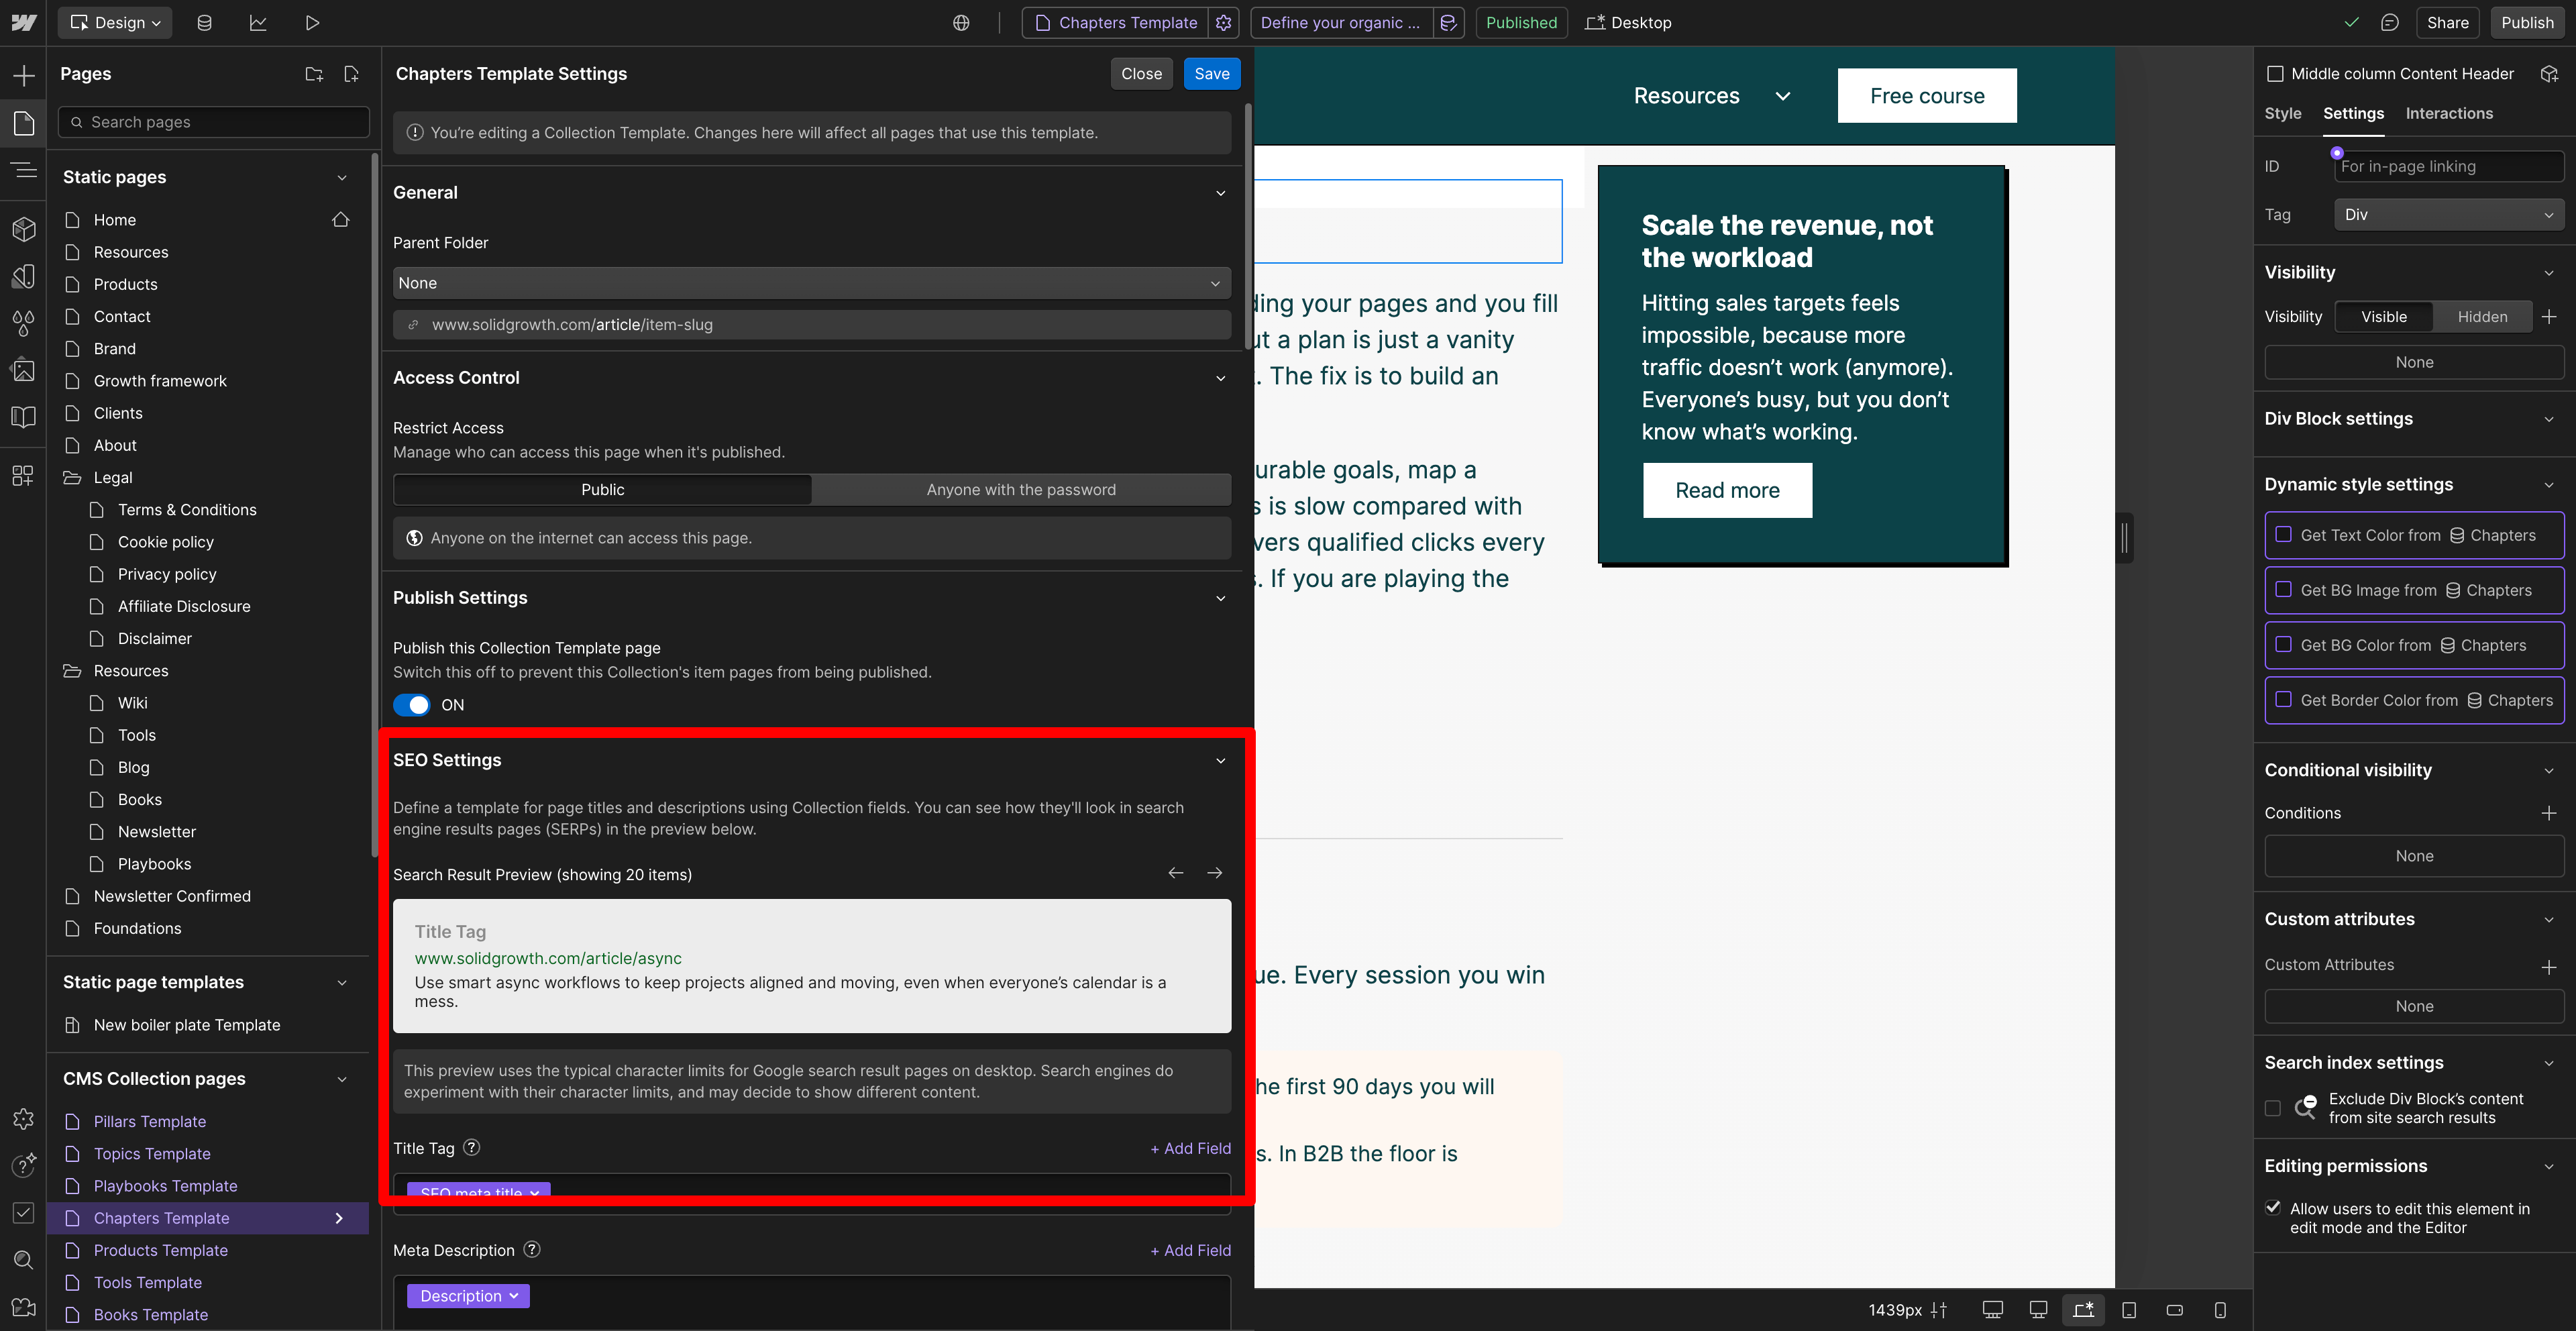
When you open the page, you'll see the SEO settings in here.
How to add your title tag and meta description in Webflow
Method 1 – Custom fields (full control)
Create two new CMS fields named SEO meta title and SEO meta description. Fill them by hand for every article. This lets you use every character and tailor each snippet.
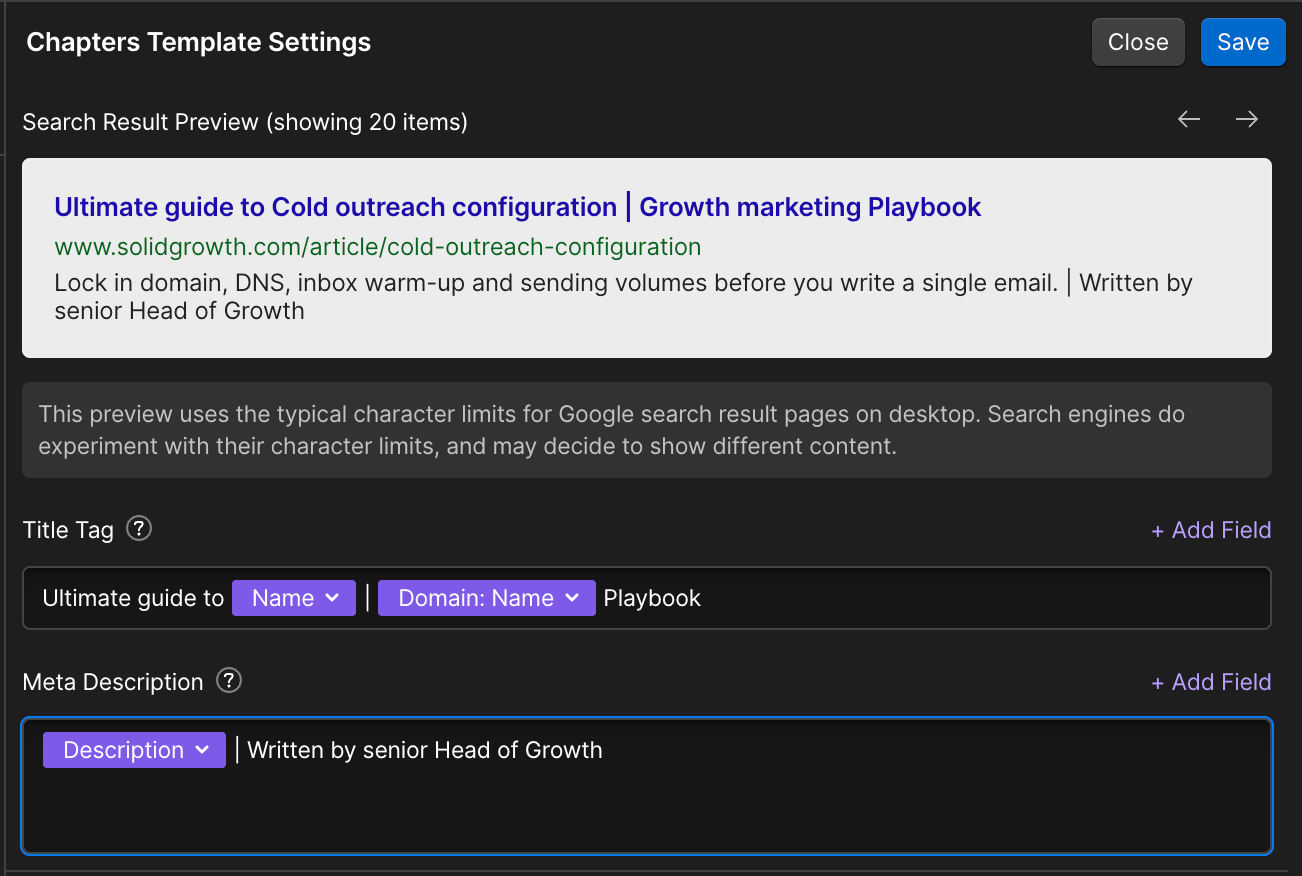
Method 2 – Dynamic pattern (set and forget)
If you do not want to edit every post, use a pattern like {{postTitle}} | Solid Growth in the SEO settings. Webflow swaps the post title in automatically. Fast but wastes unused characters.
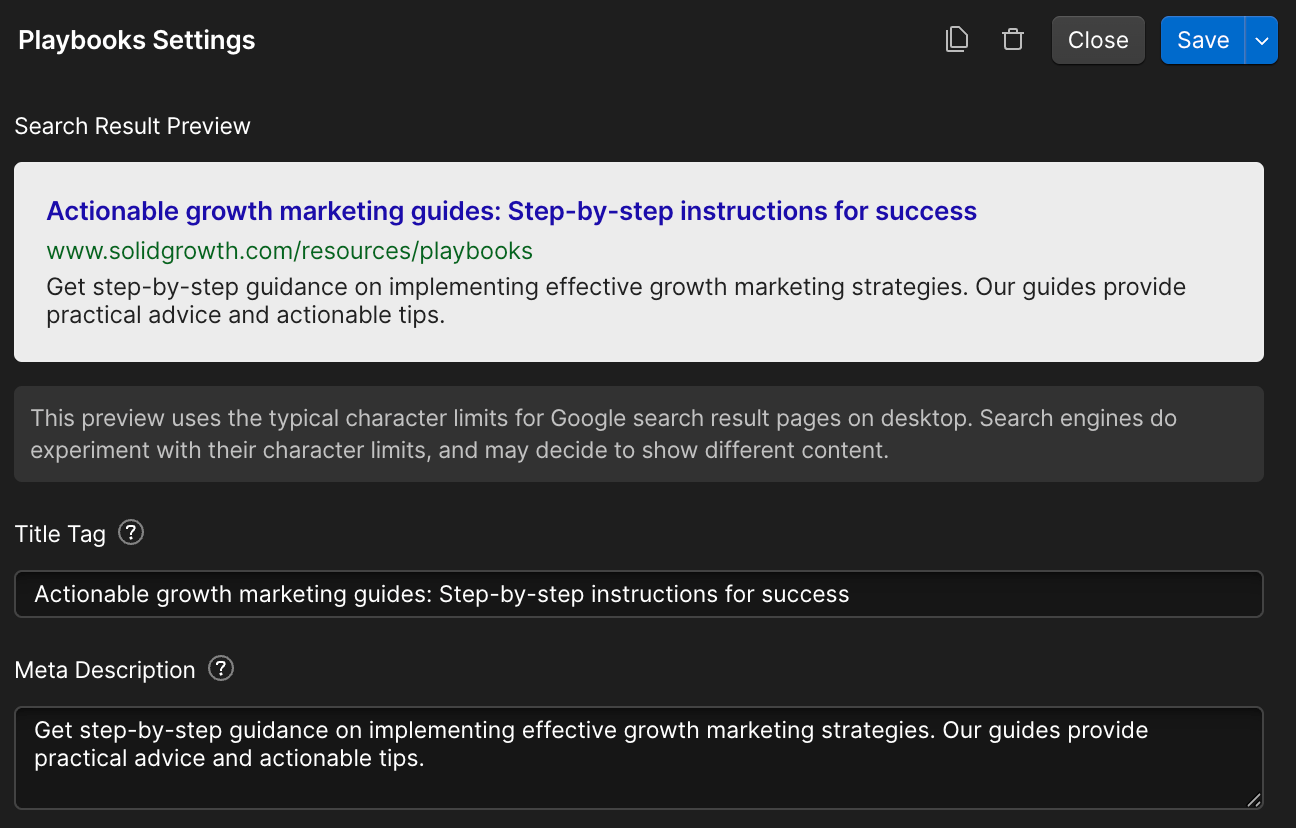
Method 3 – Static page edit (one-off pages)
For standalone pages open Page settings → SEO and paste the title and description directly into the boxes. Ideal for pillar pages or landing pages that live outside the CMS.
How to write a great SEO meta title and description
Lead with the outcome the reader cares about, then add the keyword once. Avoid repeating the same phrase in the description. Instead, rephrase it and highlight a second benefit so the two lines work together.
Bad example:
What is go to market strategy In this article we delve into what a go to market strategy is and why it is important for companies in today’s rapidly evolving landscape.
Good example:
Go to market plan in 30 days, free B2B template Step-by-step guide with editable sheets that help B2B founders build and launch a go to market plan fast and win their first customers.
Character length limitations
Google shows about 55 characters of a title tag and 160 characters of a meta description. Go longer and the extra words vanish behind an ellipsis. You can exceed the limits, but the cut-off versions look sloppy and often hide the benefit you worked hard to write. Keep titles under 55 characters and descriptions under 160 so the full promise stays visible in every result.
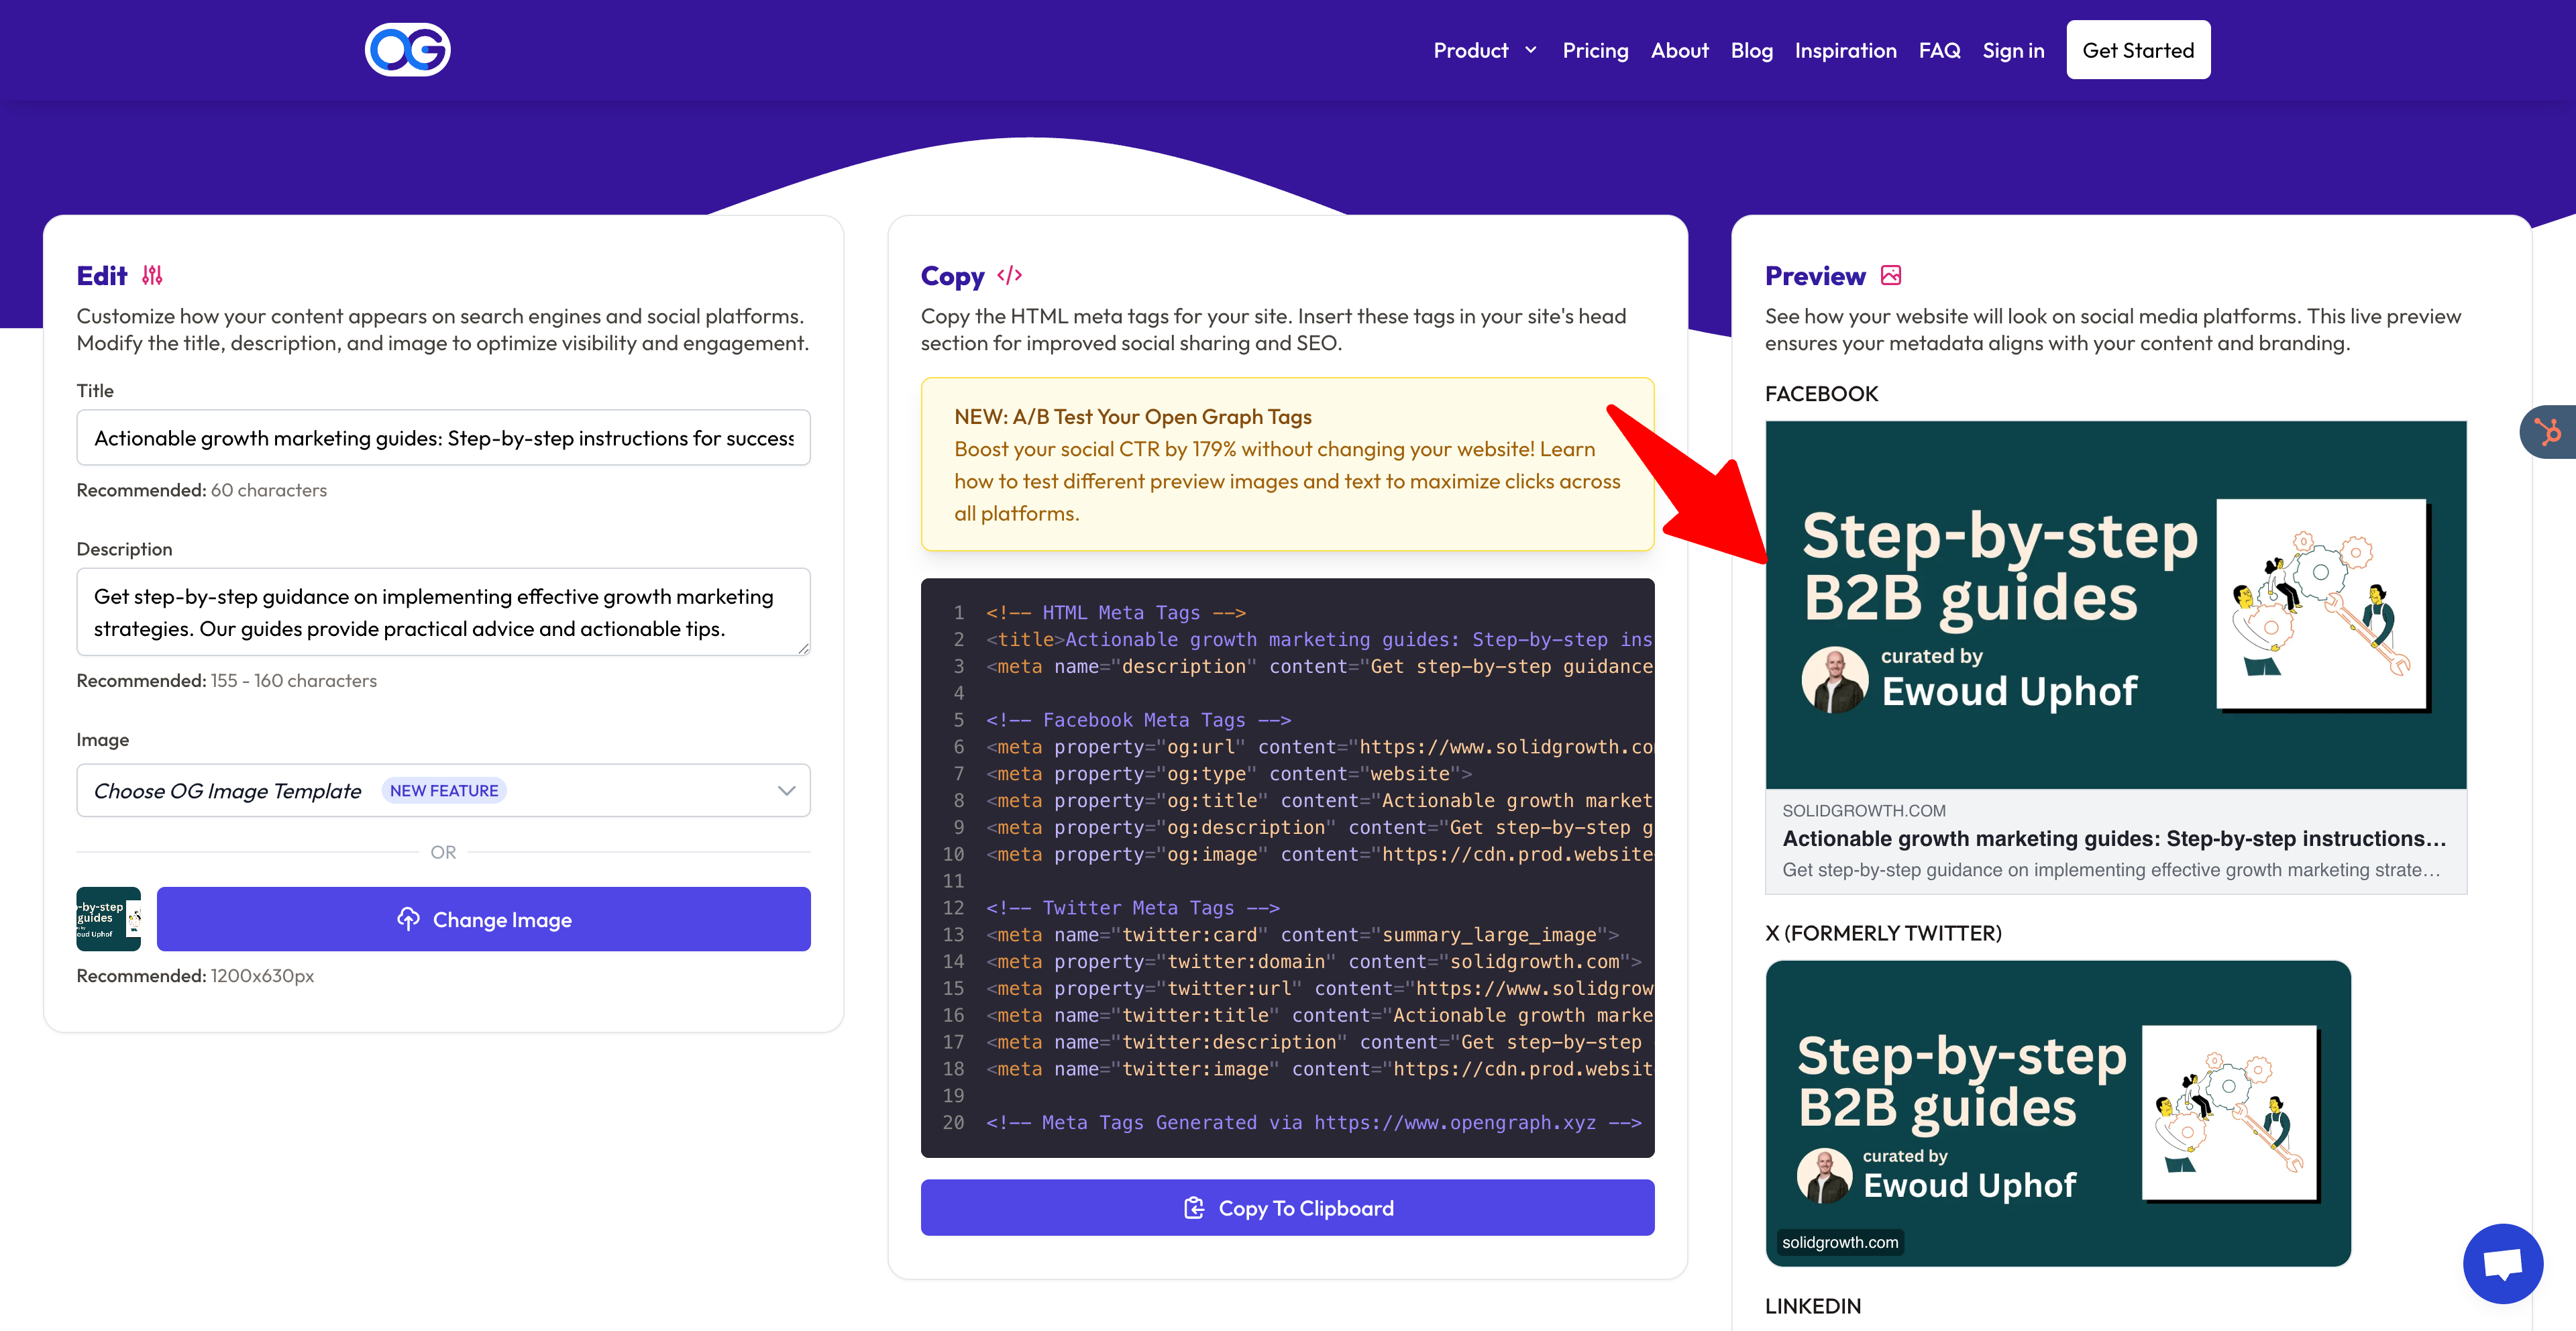
Open Graph image and social preview
Next to search engines, you article could also be shared on social media, or anywhere people paste the link. In that case in image is shown called the open graph image. If you leave the Open Graph image empty the preview shows a blank box or whatever random picture the crawler finds. It looks messy and costs clicks. I use opengraph.xyz to show the preview. Here's what an empty image looks like:
That's a missed opportunity, so let's add the image.
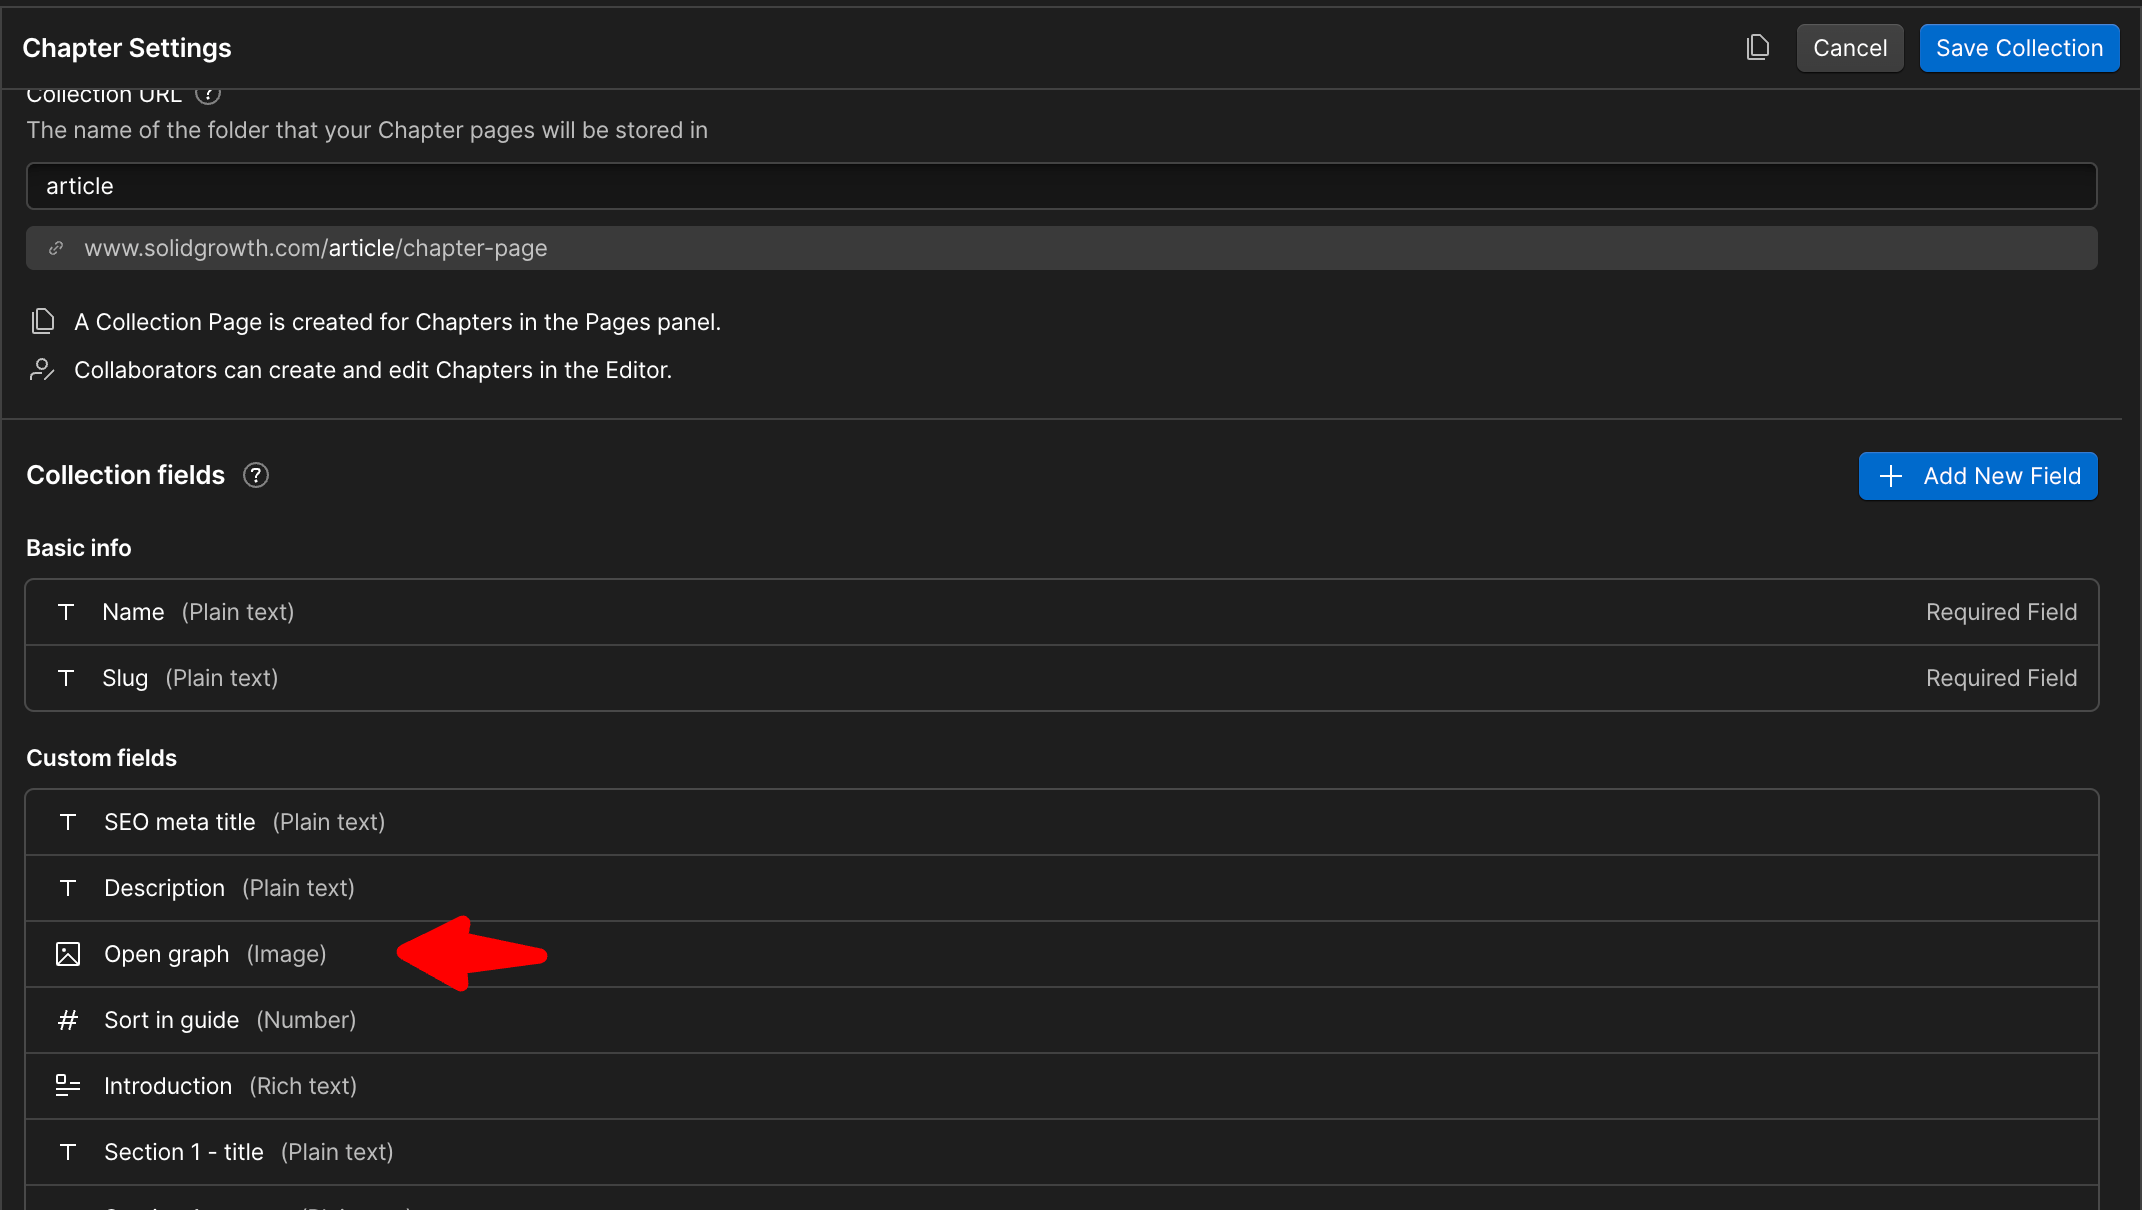
Add an Open Graph image field
In the CMS create a new image field called Open Graph. This lets every article store its own open graph image.
Link the field in Page Settings
Open the page settings you used for the SEO title and description. In the Open Graph panel choose image field you have created. NB you can only add an image field. Now the CMS feeds the banner to social sites automatically.
Design the open graph image
Use Canva or Figma at 1200 × 630 pixels, headline on the left, small logo on the right.
Preview before you share
Paste the link into opengraph.xyz and see if the image is showing up correctly. If the card shows the right image and text you are set to publish.
Add basic Article schema
Article schema is a small block of JSON-LD code that tells Google, Bing and AI tools your page is a written guide. It labels the headline, author and publish date, helping crawlers parse the content fast and unlocking rich results such as date stamps or author badges.
Why beginners should care
Adding schema takes two minutes and needs no coding skill beyond copy-and-paste, yet it boosts trust signals and can improve click-through when Google shows enhanced snippets. Without it, the crawler must guess and may miss key details.
Copy the code
Replace the placeholders in the snippet below with your own data.
Paste it in Webflow
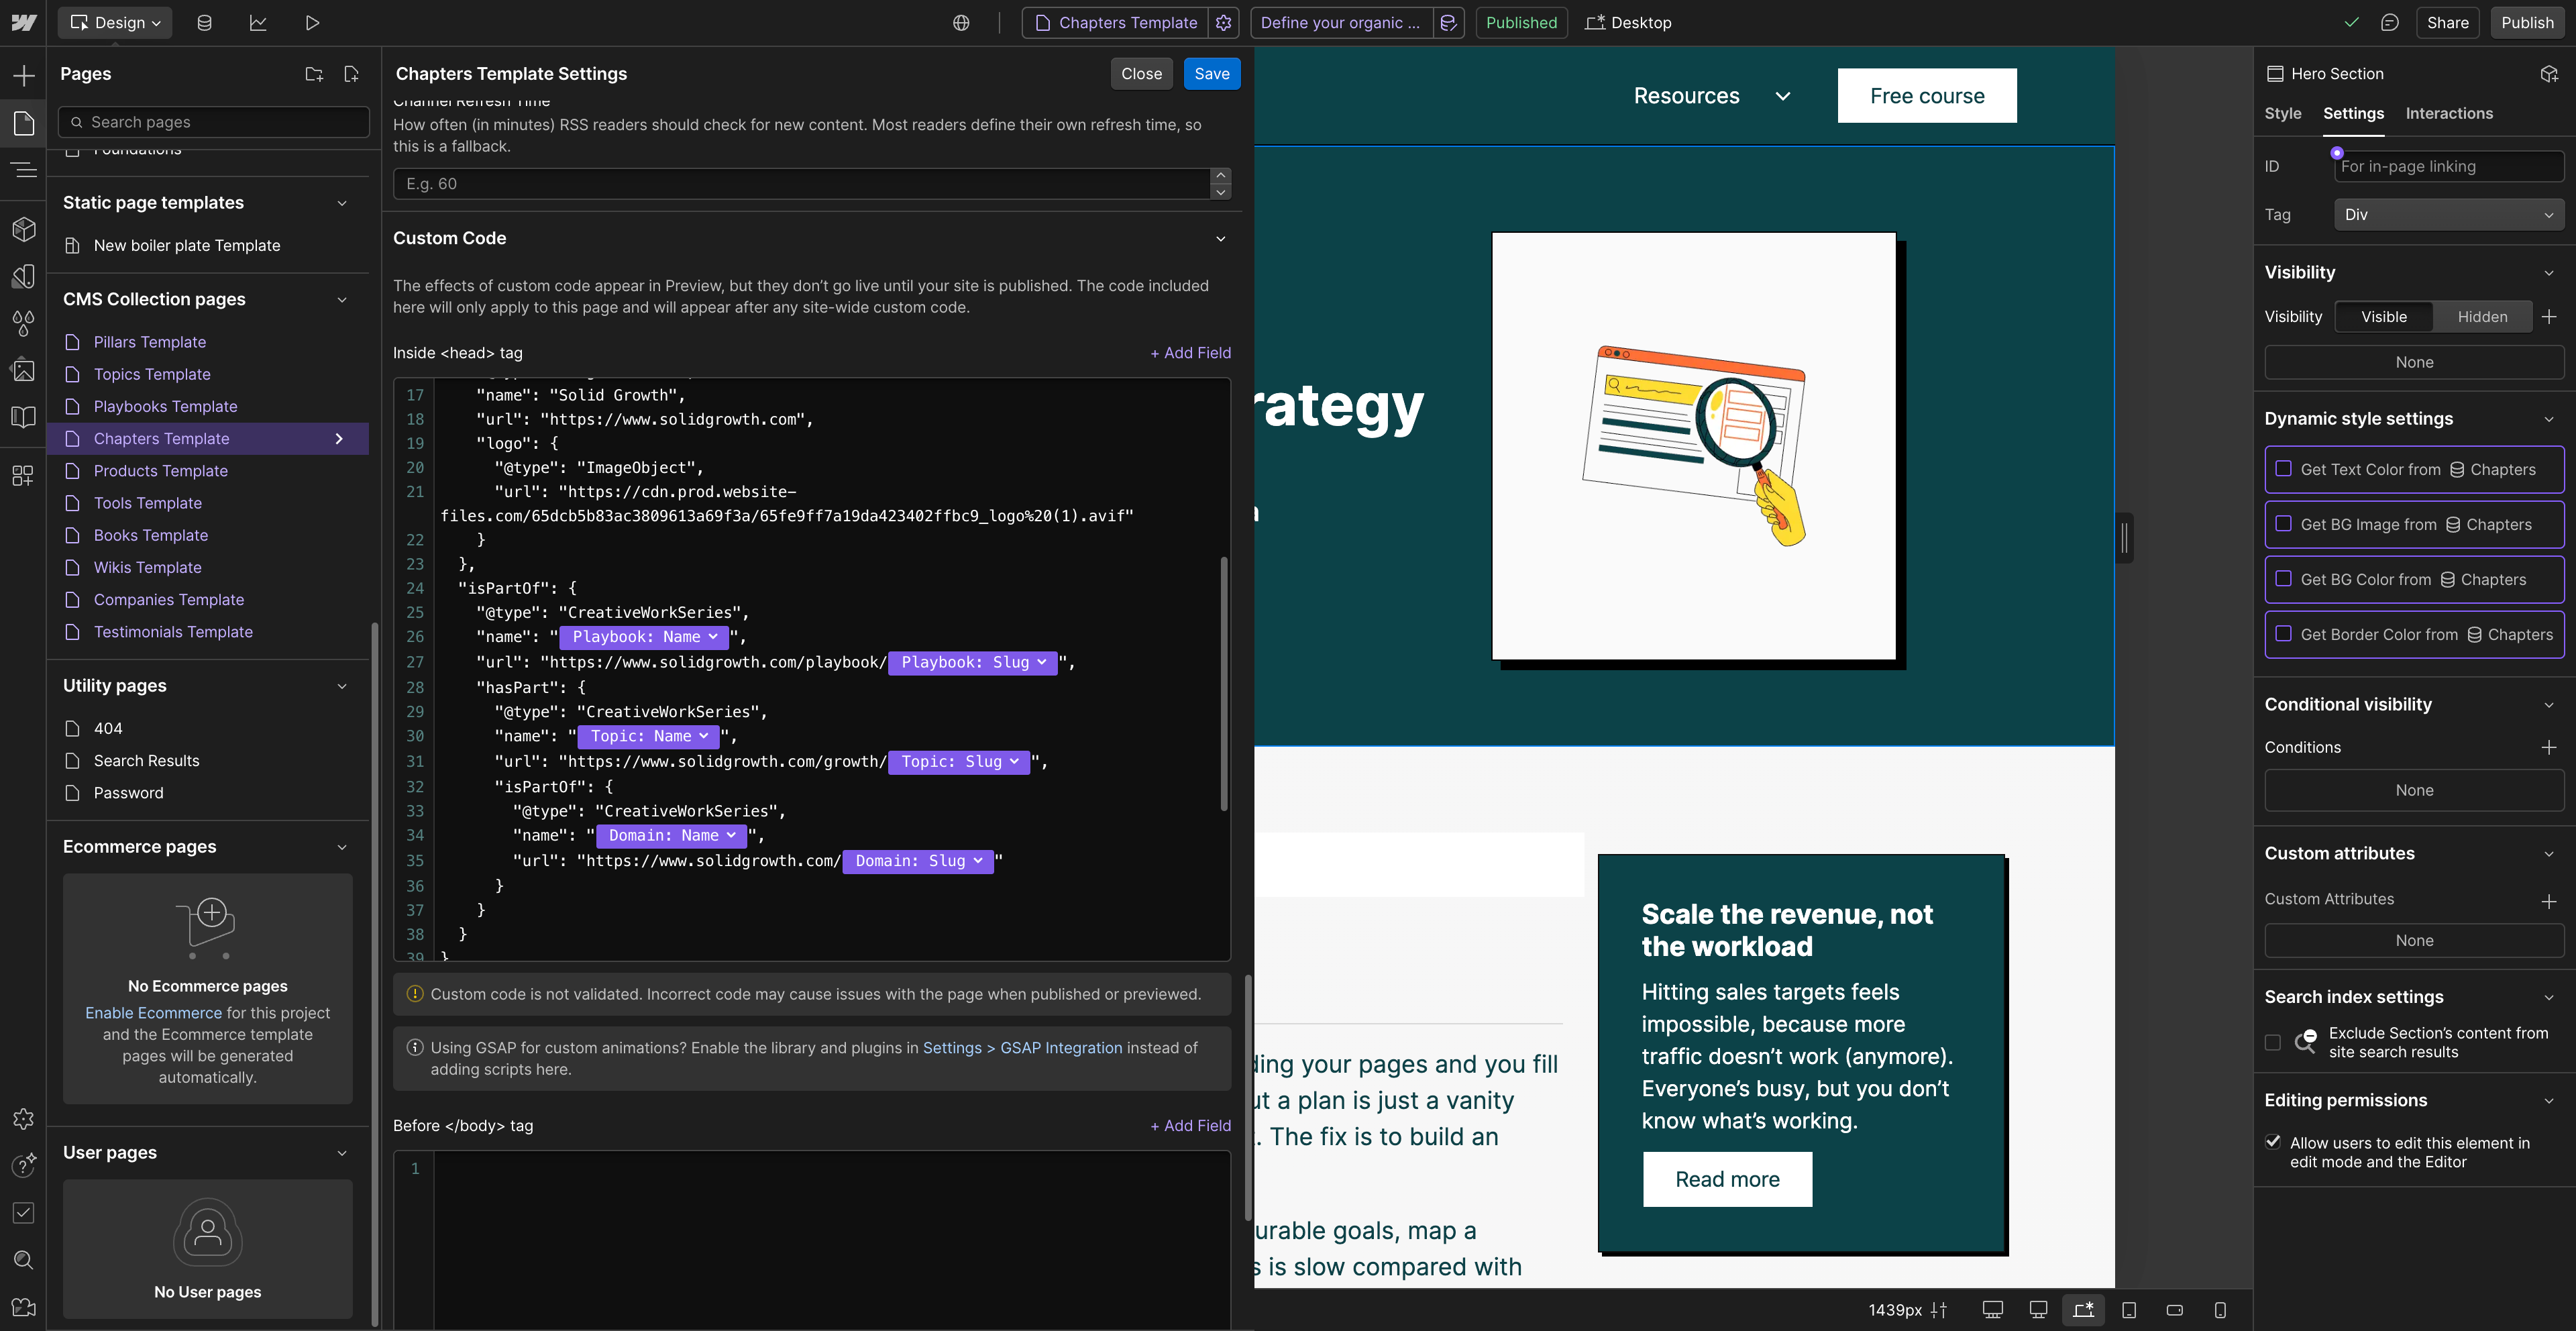
Open Page settings → scroll all the way down to Custom code → Head and drop the snippet in the box.
Replace the values with the variables Webflow has, as shown below in the print screen. Don't forget to Save and publish.
Test in Google Rich Results
Go to Google’s Rich Results Test, paste your URL and run the scan. A green tick means the schema is valid. If you see errors, check for missing commas or quotation marks, fix them and retest.
With Article schema in place your guide is machine-readable, eligible for richer snippets and ready for the next optimisation step: building an internal link hierarchy.
Build smart internal links across your content
Now that the metadata is in place, the next boost comes from internal links. Good links do two jobs at once: they help readers move up and down the content tree and they spread authority across every pillar, topic and playbook.
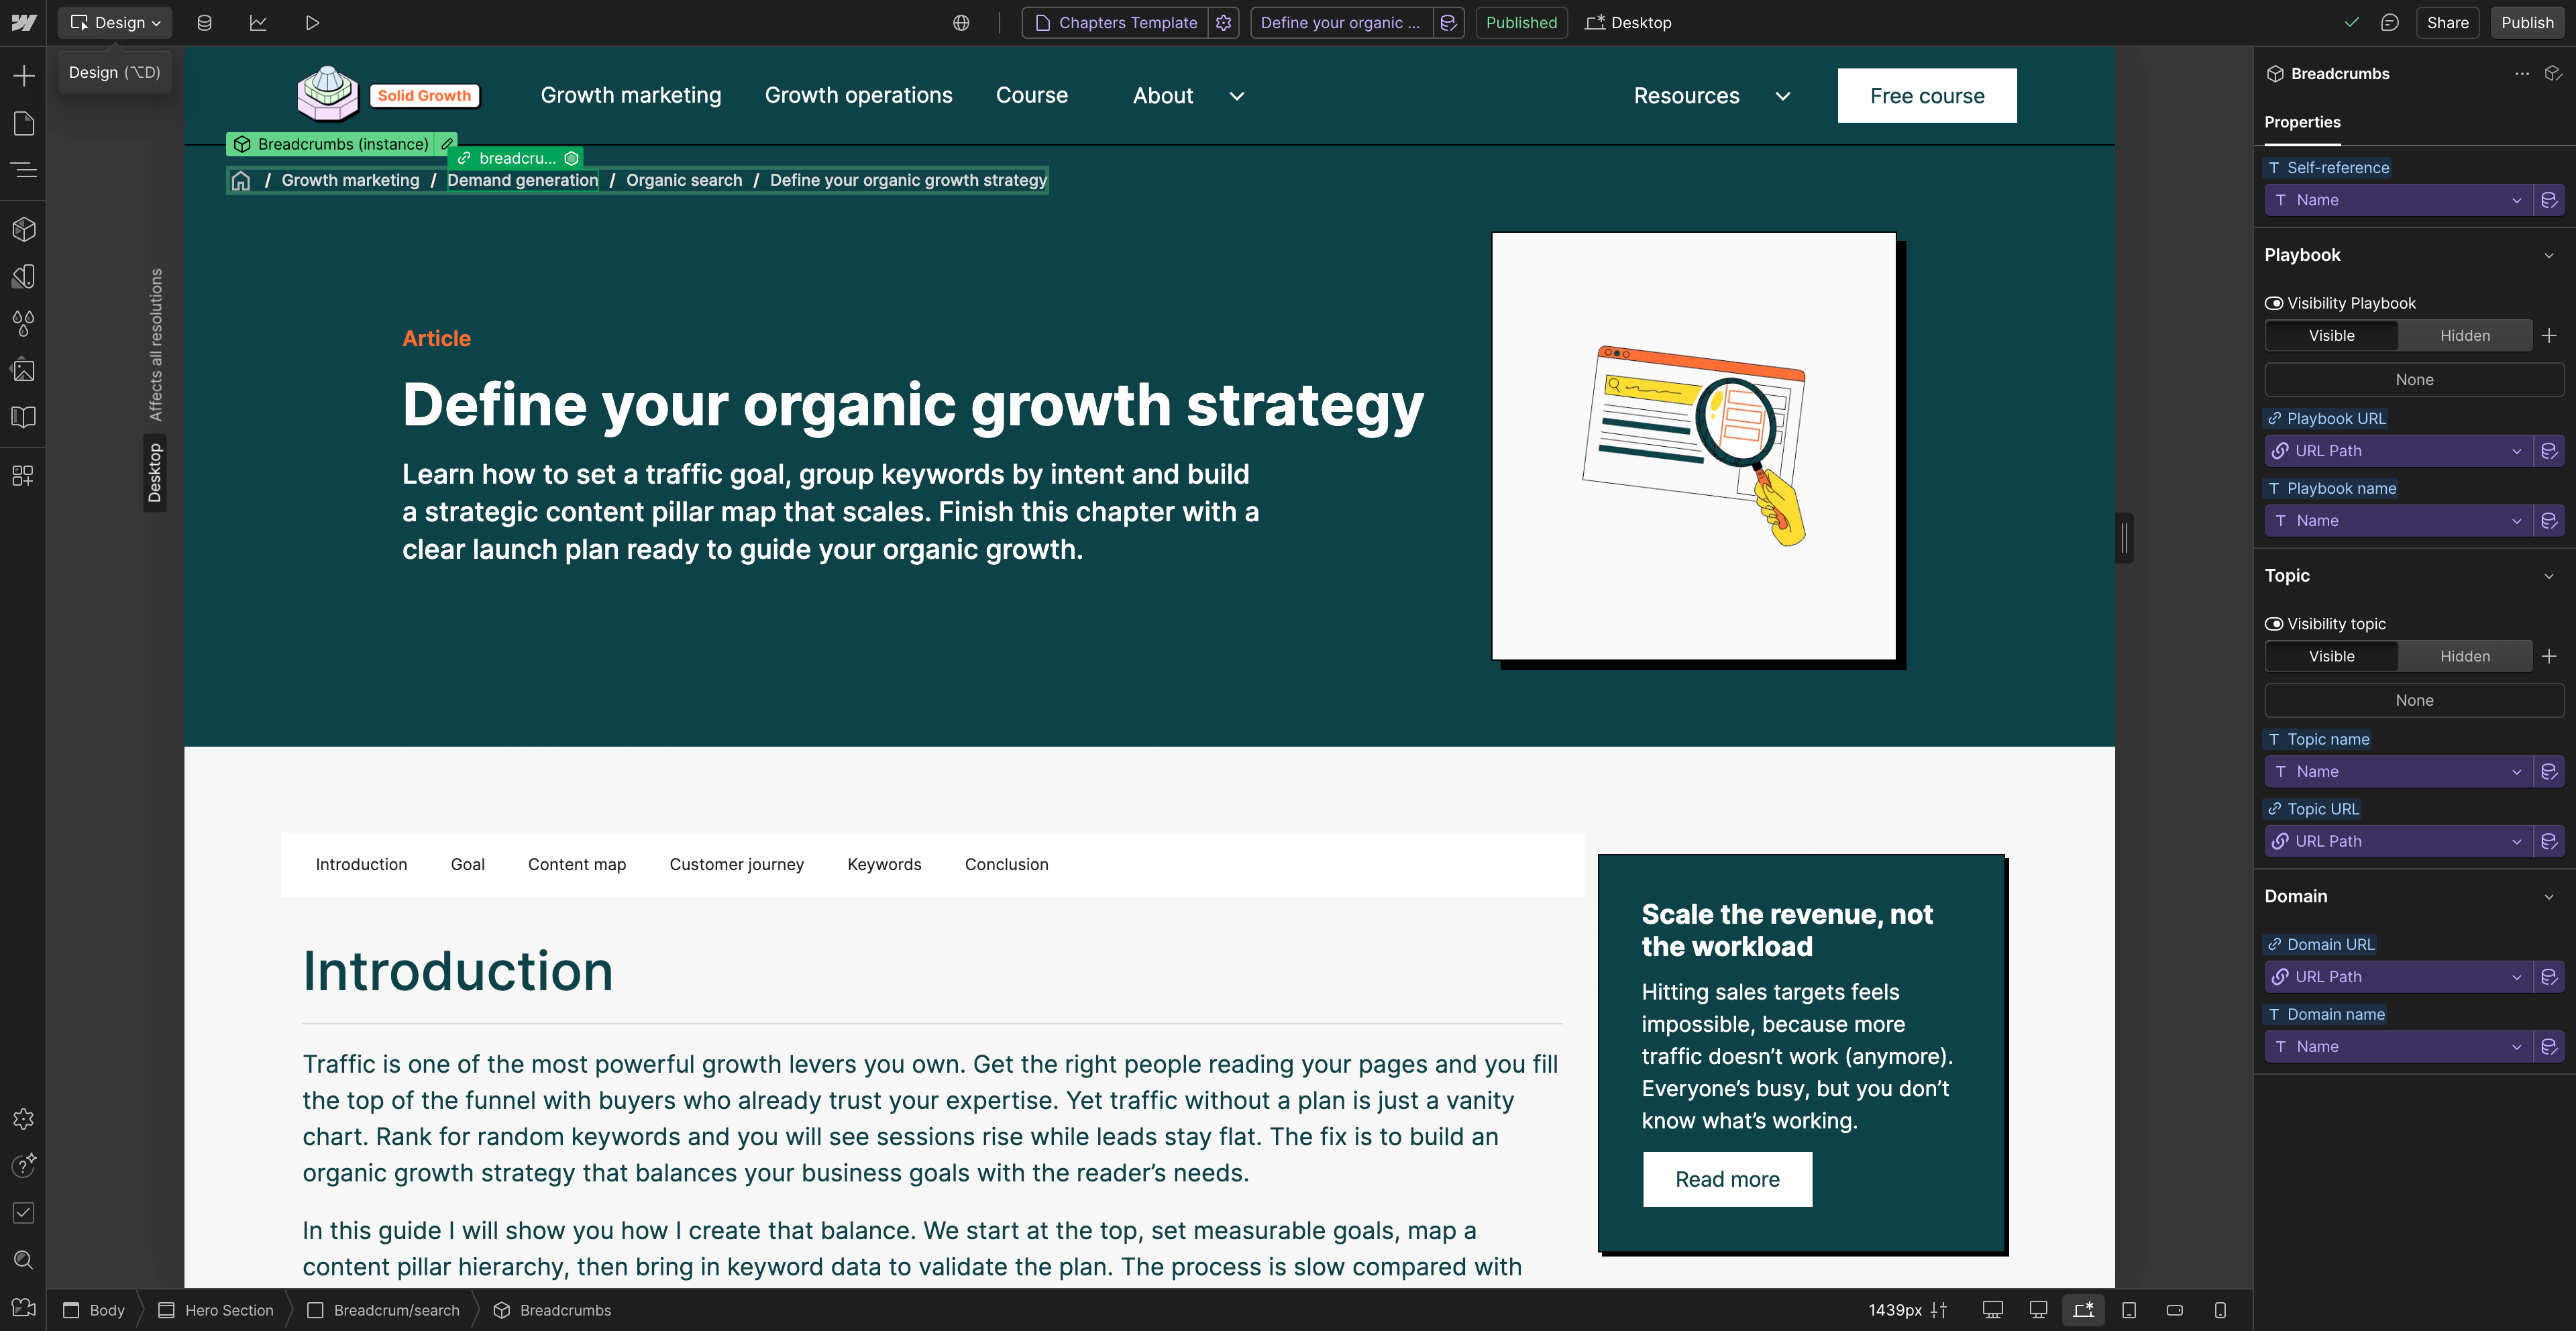
Create a dynamic breadcrumb in Webflow
I handle most of this automatically with a breadcrumb: each article is linked in the CMS to 1) playbook, 2) topic and 3) pillar in the CMS, and Webflow builds the path for me. On the right you can see how I linked this to the component of the breadcrumb.
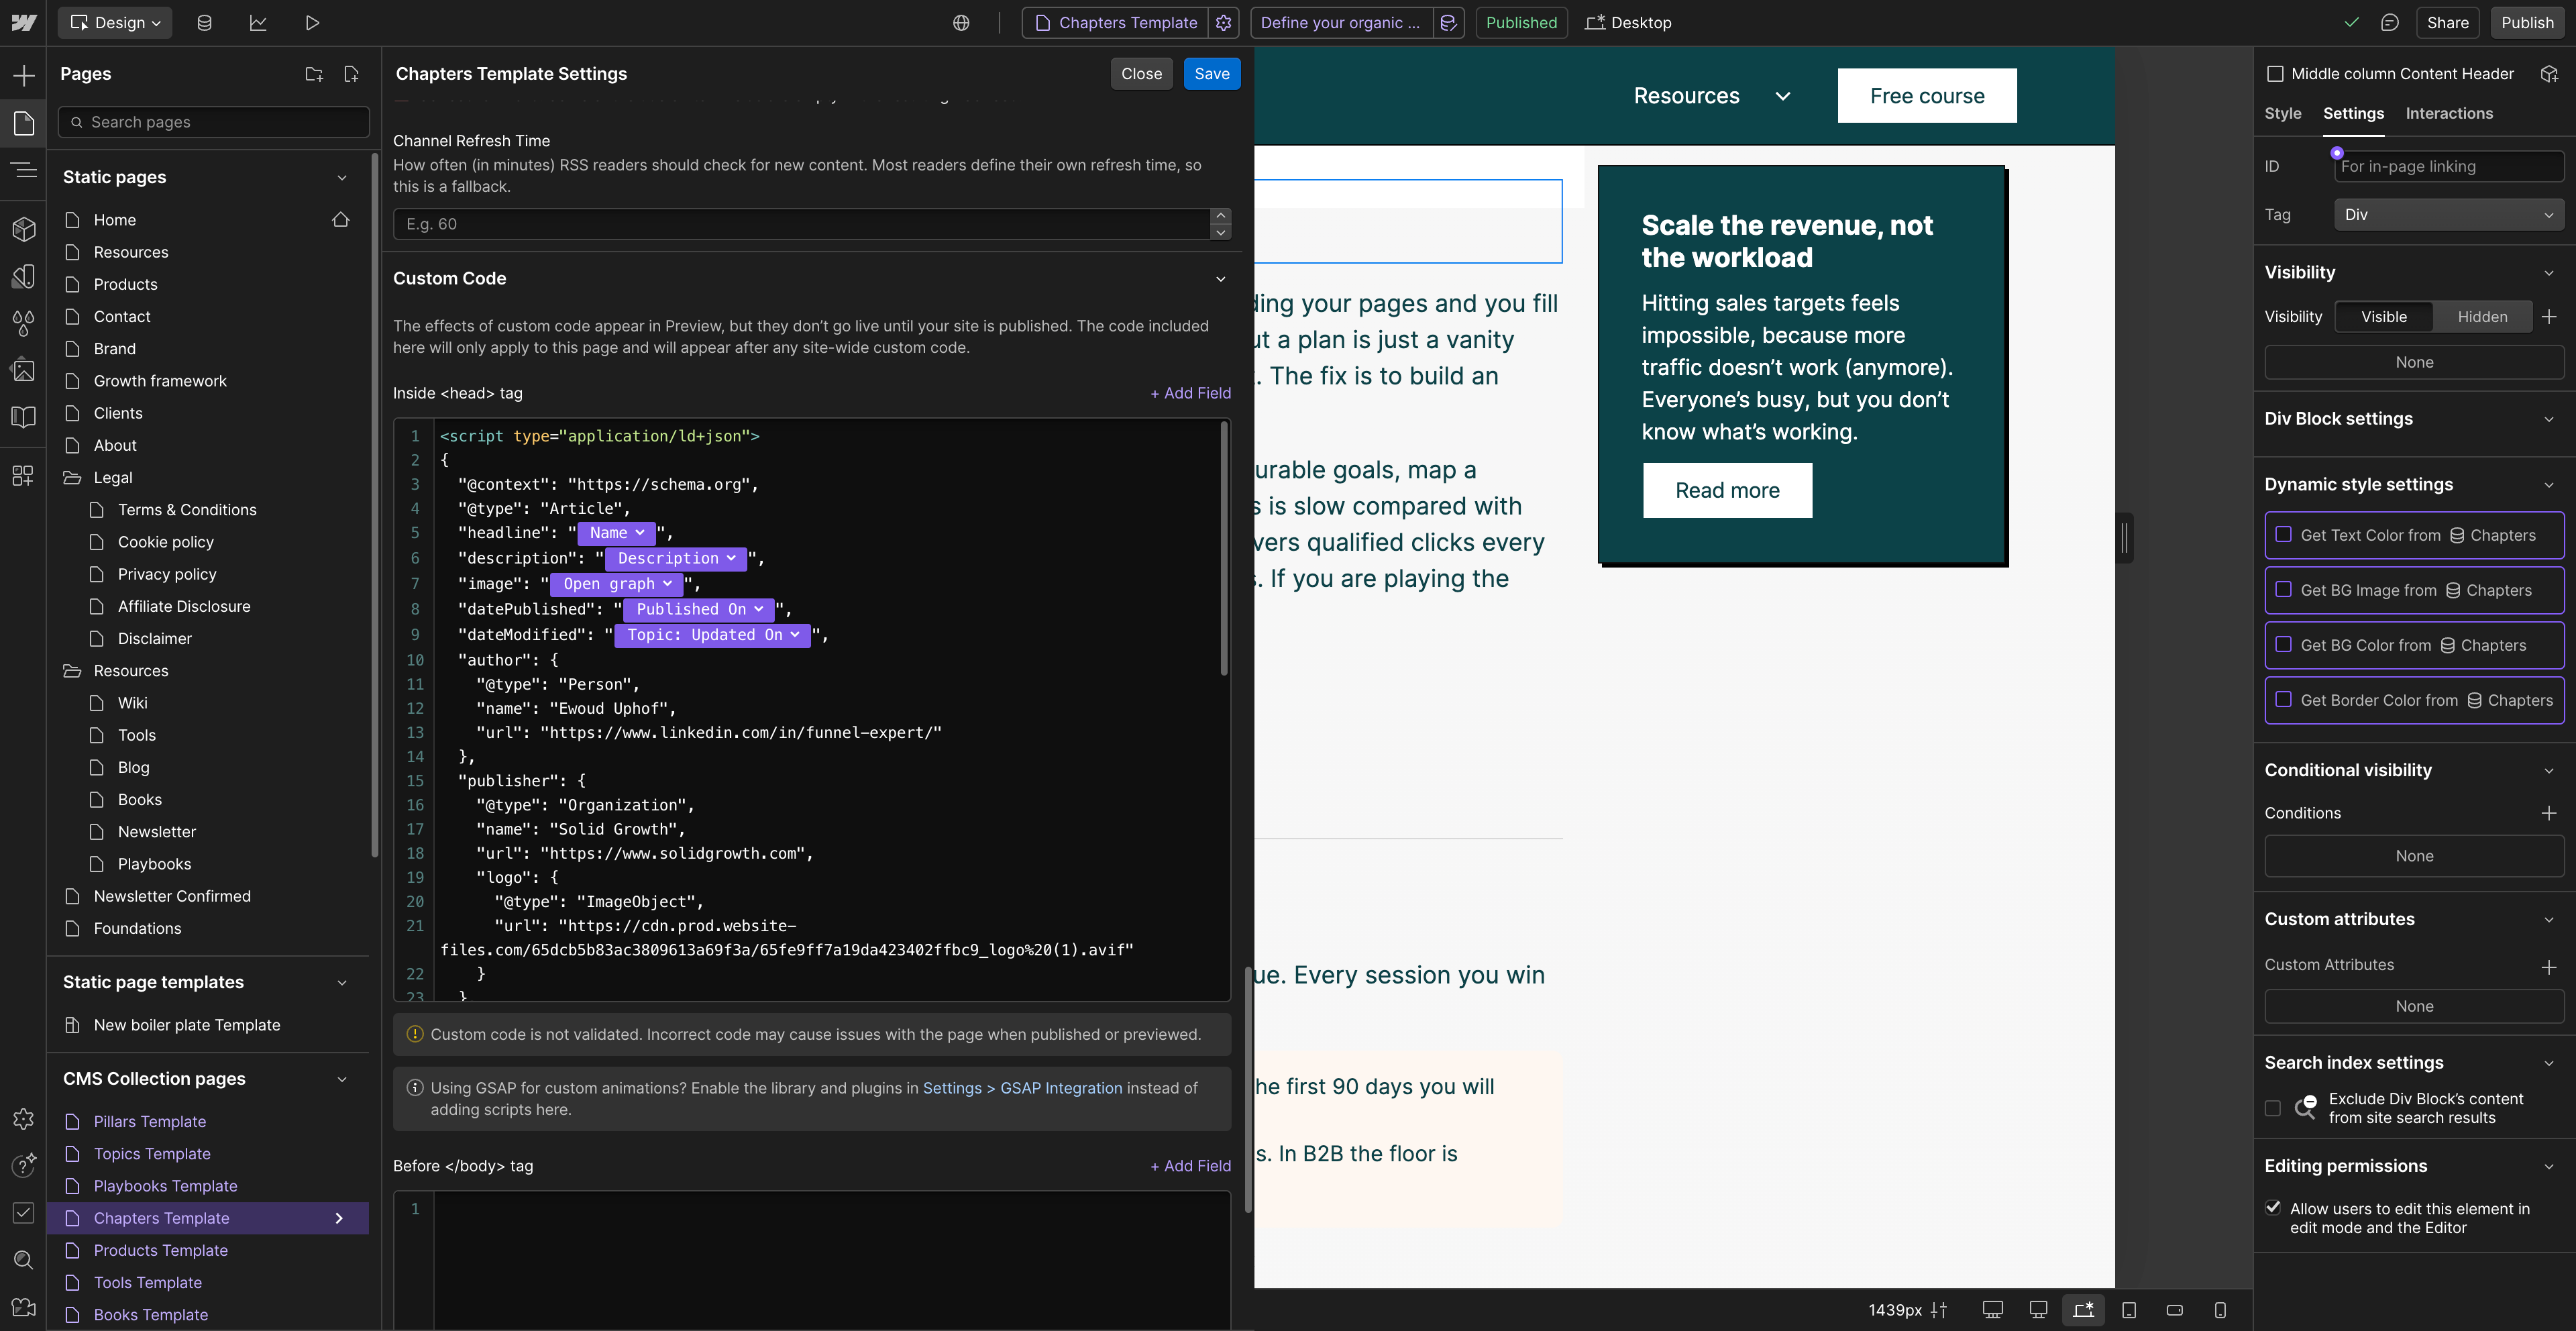
Add a breadcrumb in JSON-LD
Crawlers need a machine-readable breadcrumb as well. It looks complicated, but you can copy, paste and replace the bracketed text. Here's what it looks like.
/im
The full code you can use is below. Replace each placeholder with your own data, publish, then run the page through Google’s Rich Results Test to confirm the breadcrumb is valid. With human-visible links, JSON-LD, and no broken URLs, crawlers can map your entire site and users never hit a dead end.
If you want to read more, check out this article by Google on breadcrumb schema.
Add internal links inside the article
Breadcrumbs cover the big jumps, but the body of the article should also guide readers (and crawlers) towards deeper pages.
Start at the top of your draft and look for spots where a reader might want more detail. When you mention a concept you already explain elsewhere, link the first reference upward to its topic page. A sentence later, link sideways to a sibling article that expands on a related tactic. By the time a visitor reaches the conclusion, they should have opened at least one additional guide without using the back button.
Here’s how it works in practice:
Internal links do a lot of heavy lifting, but they are fragile. Move a page or change a slug and the link points to a 404. Broken links waste crawl budget and drop readers into a dead end. Before the network you just built starts to leak, let’s find and fix every broken link and redirect those 404s.
Fix 404 errors and tidy up redirect chains
Fix 404s and tidy up redirects
Imagine you move house. Friends keep sending birthday cards to the old address, so the post office forwards them to your new place. That forwarding works once, but if you move again the card might take three hops before it arrives. Slow, wasteful and a few cards get lost. Websites work the same way. When a page disappears you must tell Google where the new version lives. A permanent change of address on the web is called a 301 redirect. If you do not set it up visitors hit a 404 page not found and bounce. If you set up a redirect chain with hops from A to B to C Google wastes time following the trail. The fix is simple: point every old URL straight to its latest home and remove any extra hops.
Find and fix 404s
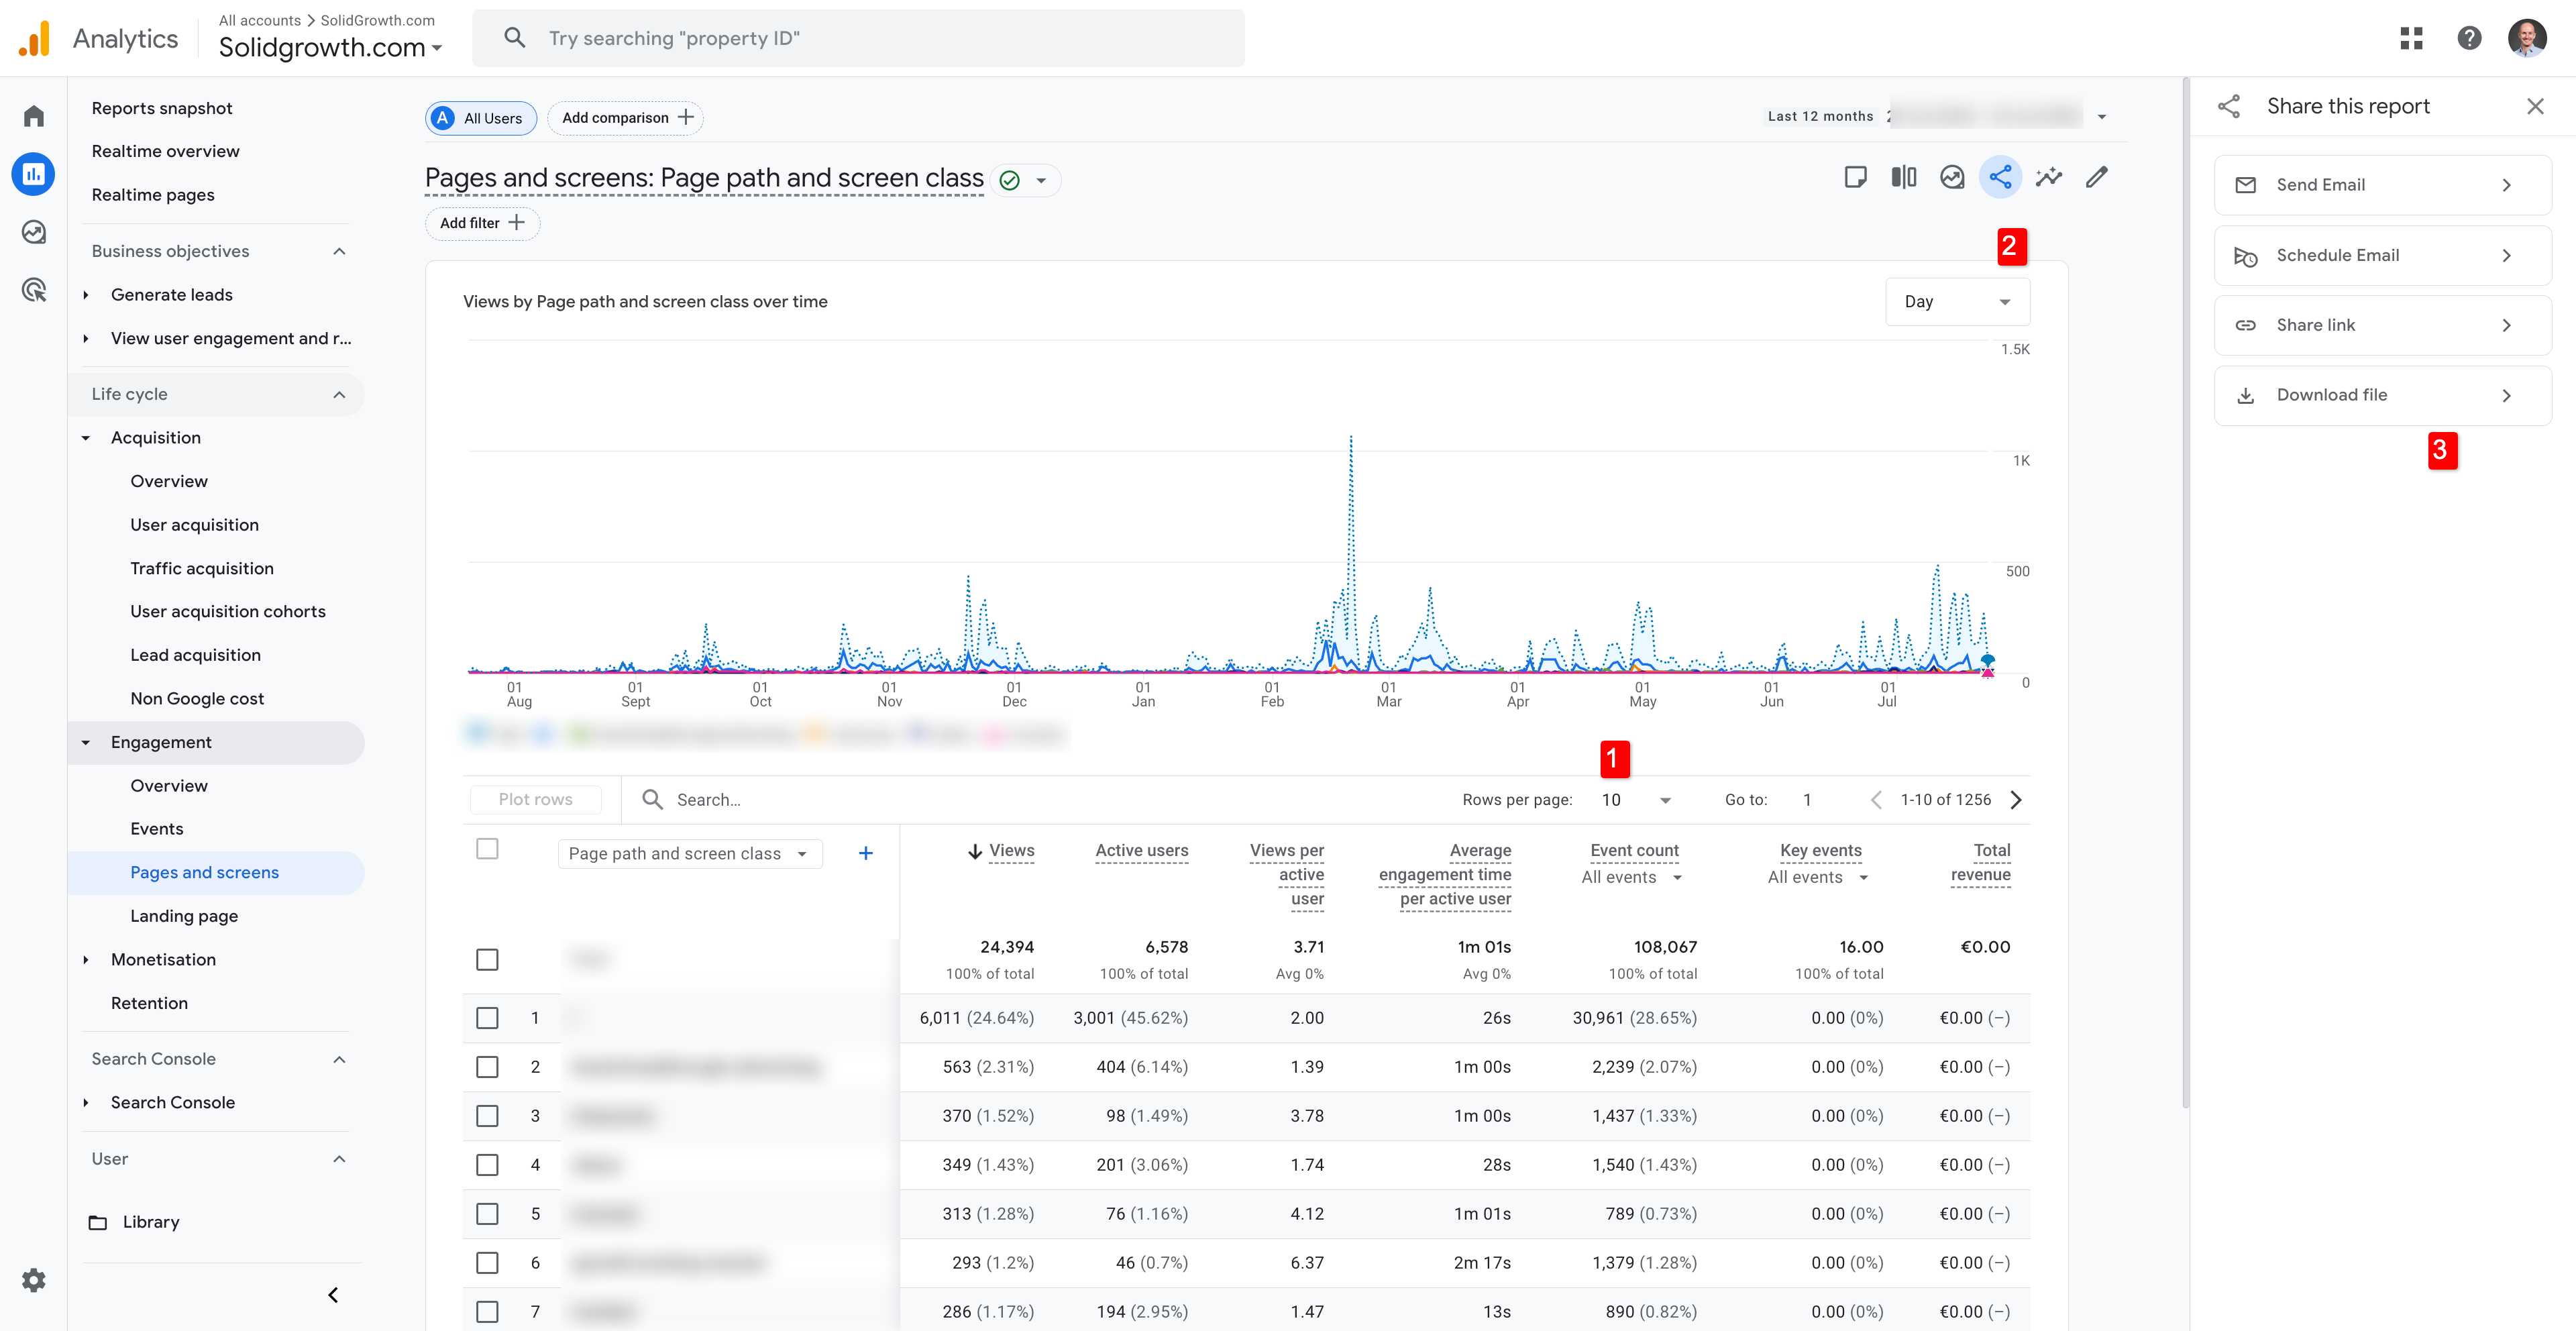
Open Google Analytics. Export the last twelve months of page views.
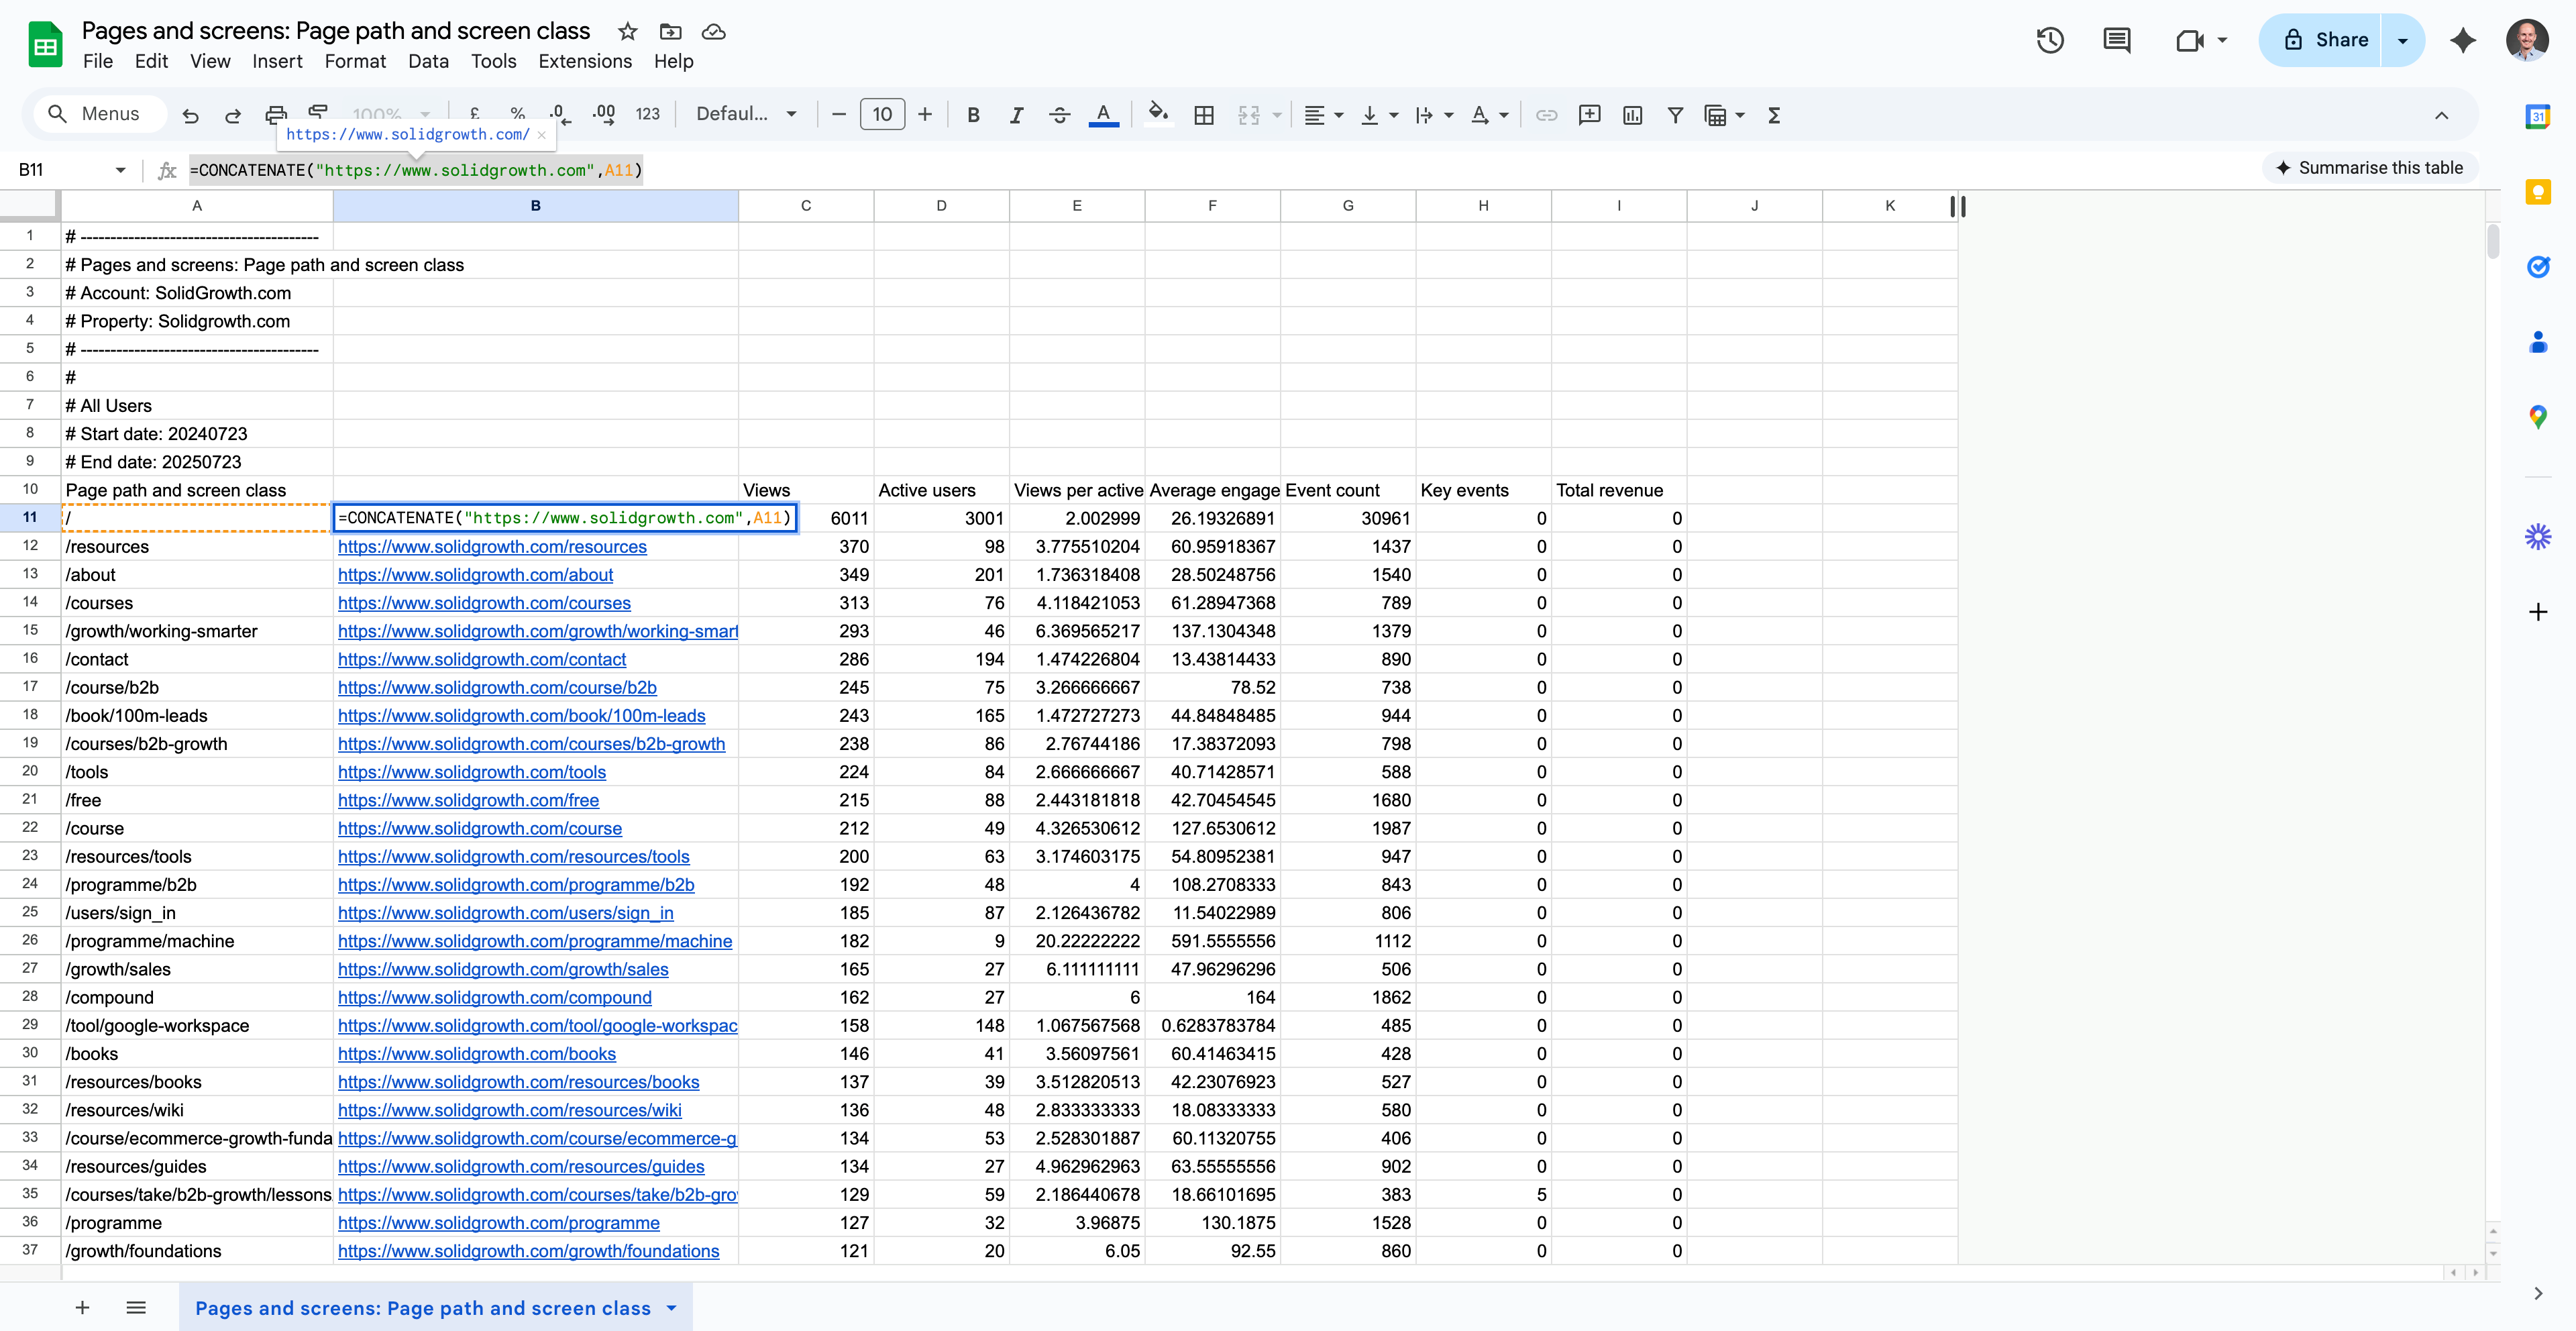
Paste the list into Google Sheets, import it into ChatGPT or use a simple filter to show status codes. Keep rows marked 404.
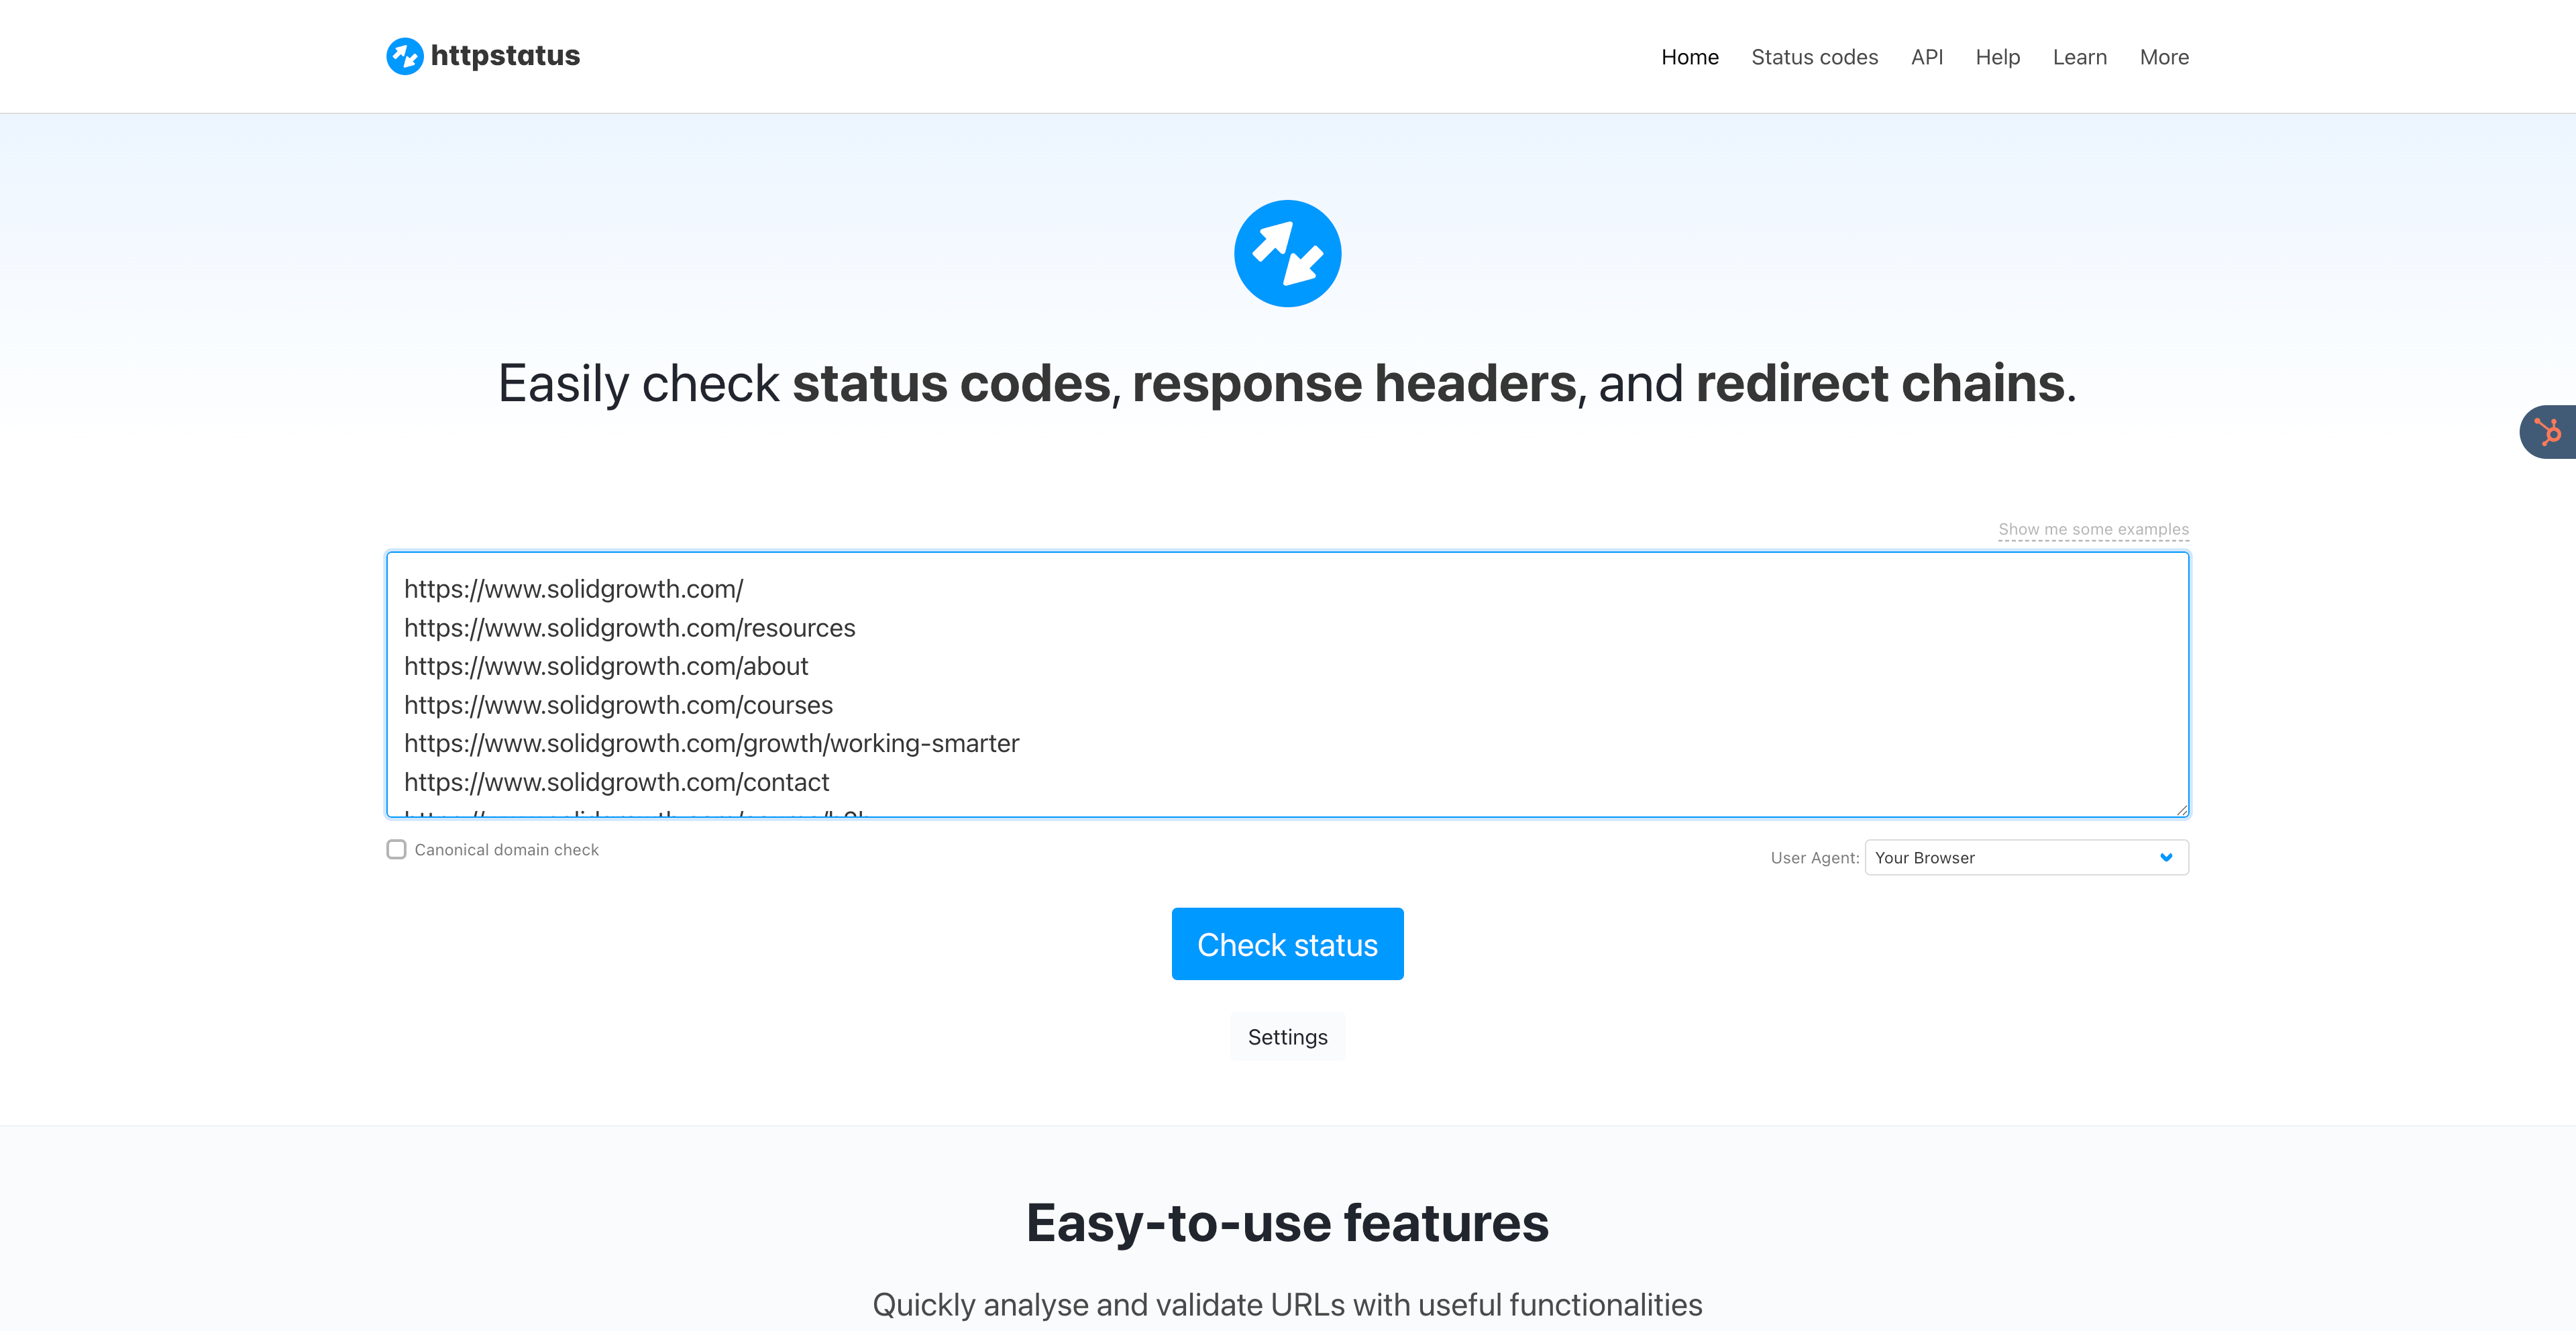
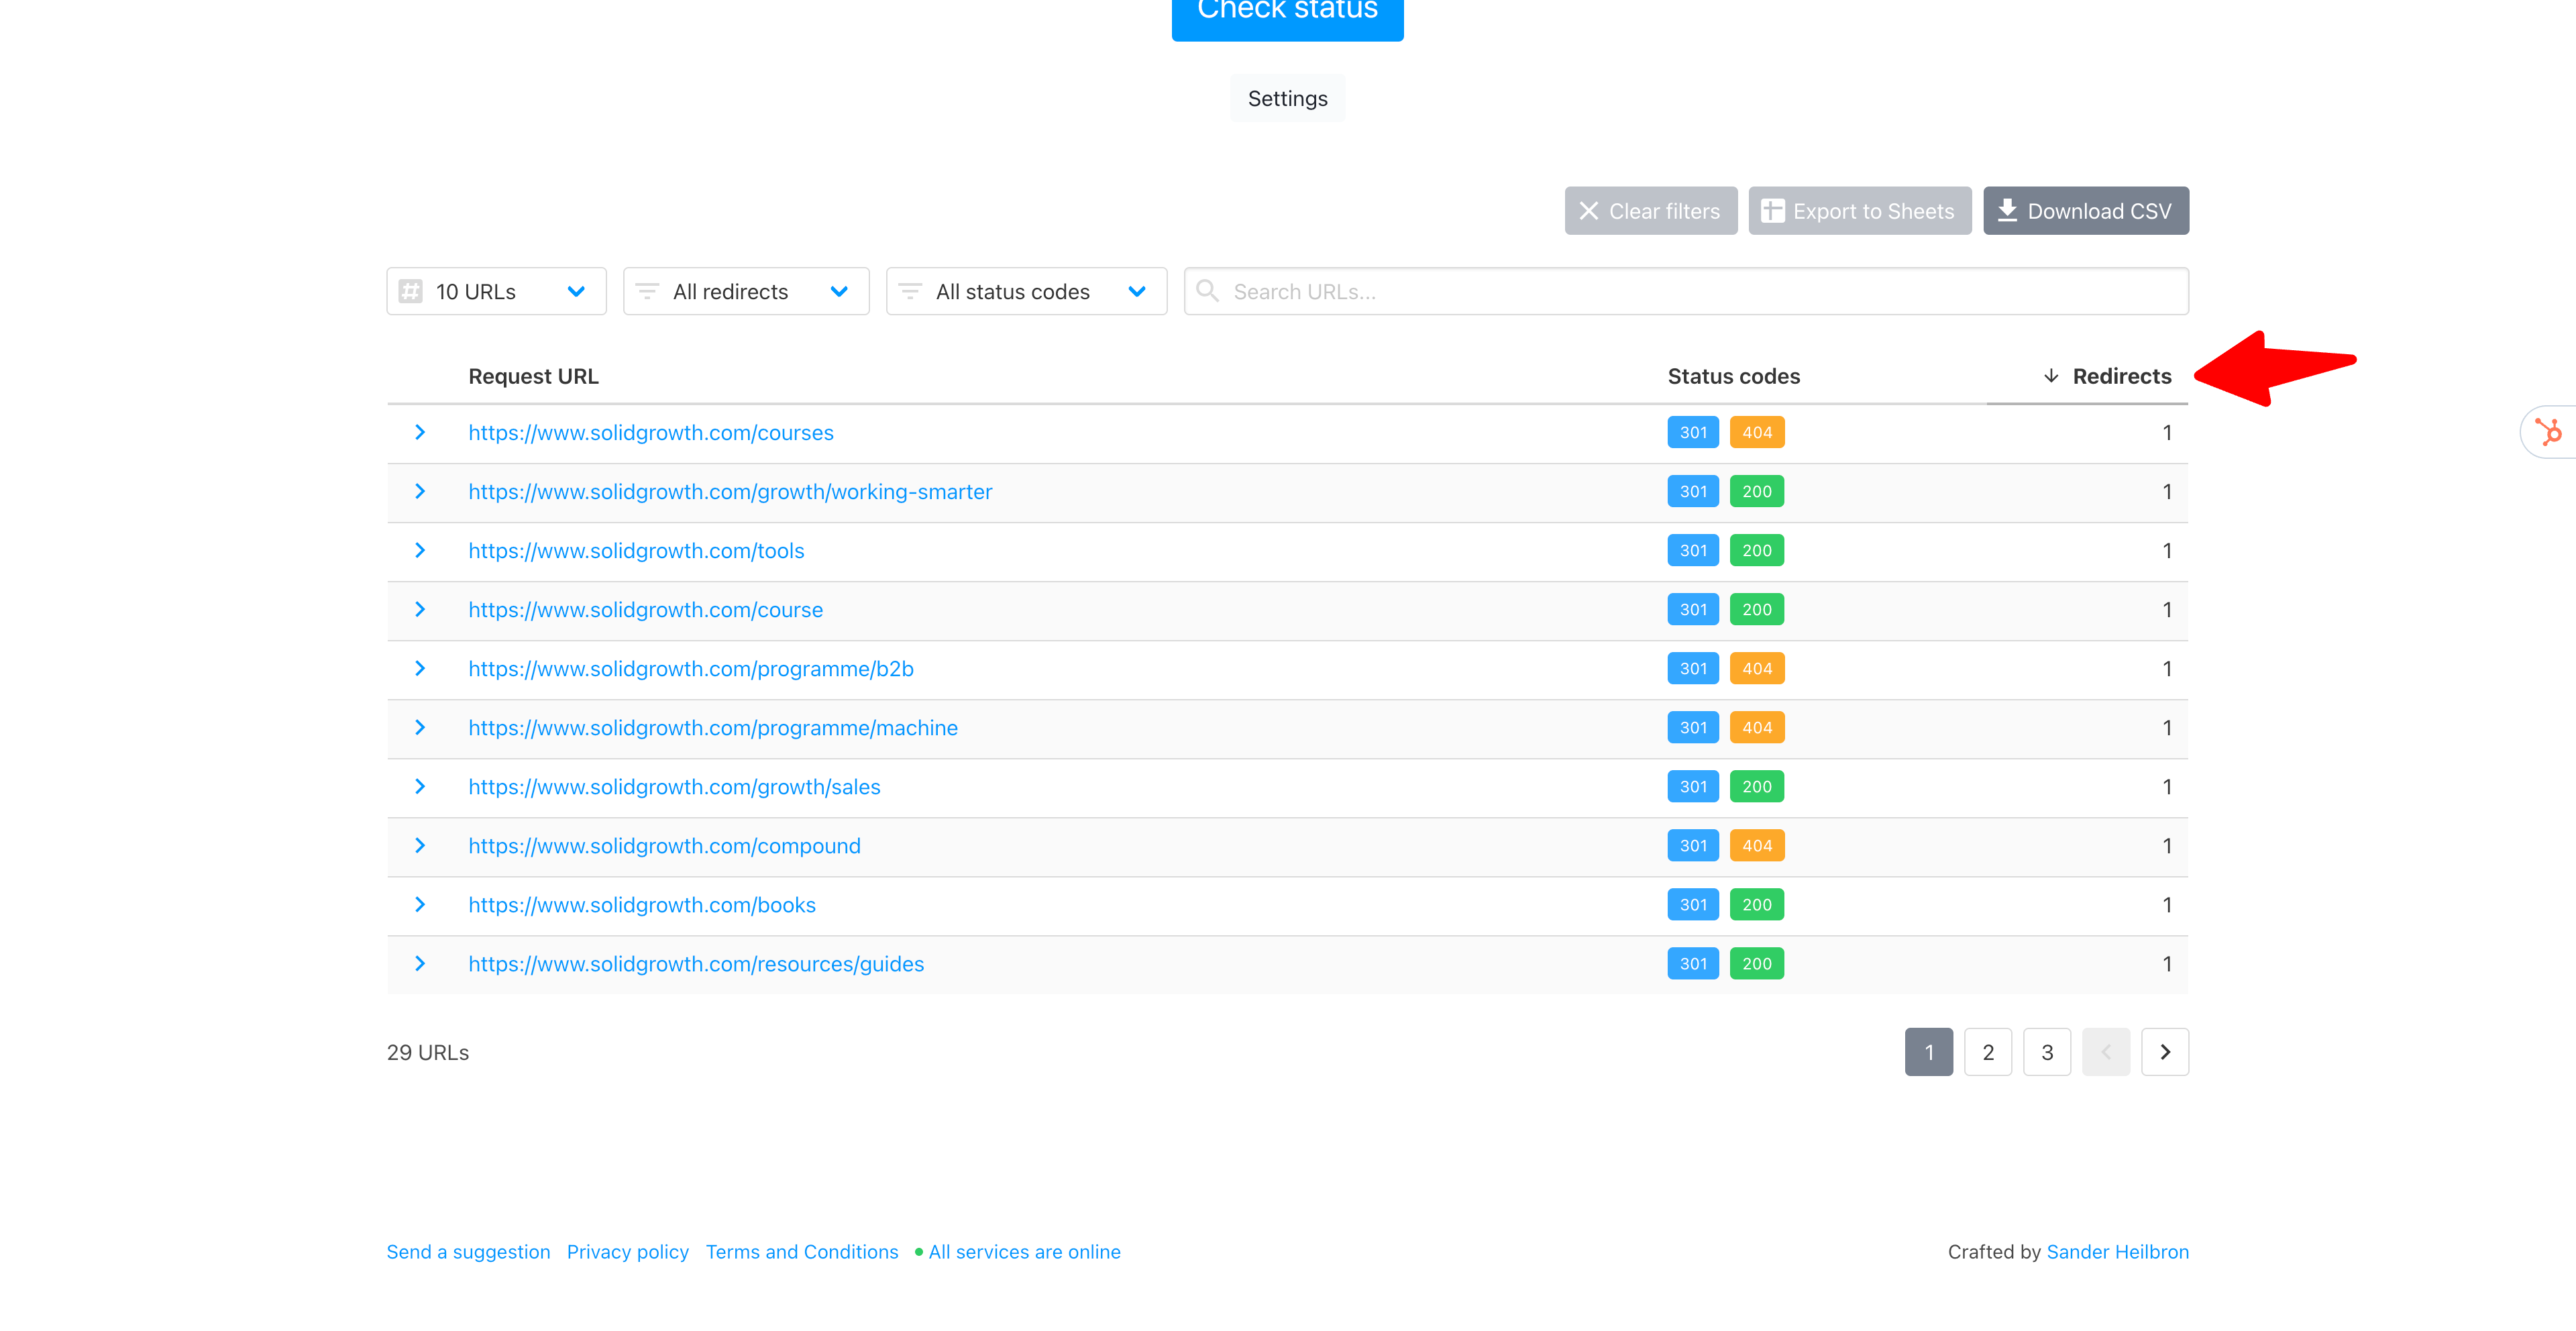
Copy the first 99 links from Google sheets and paste them in https://httpstatus.io/
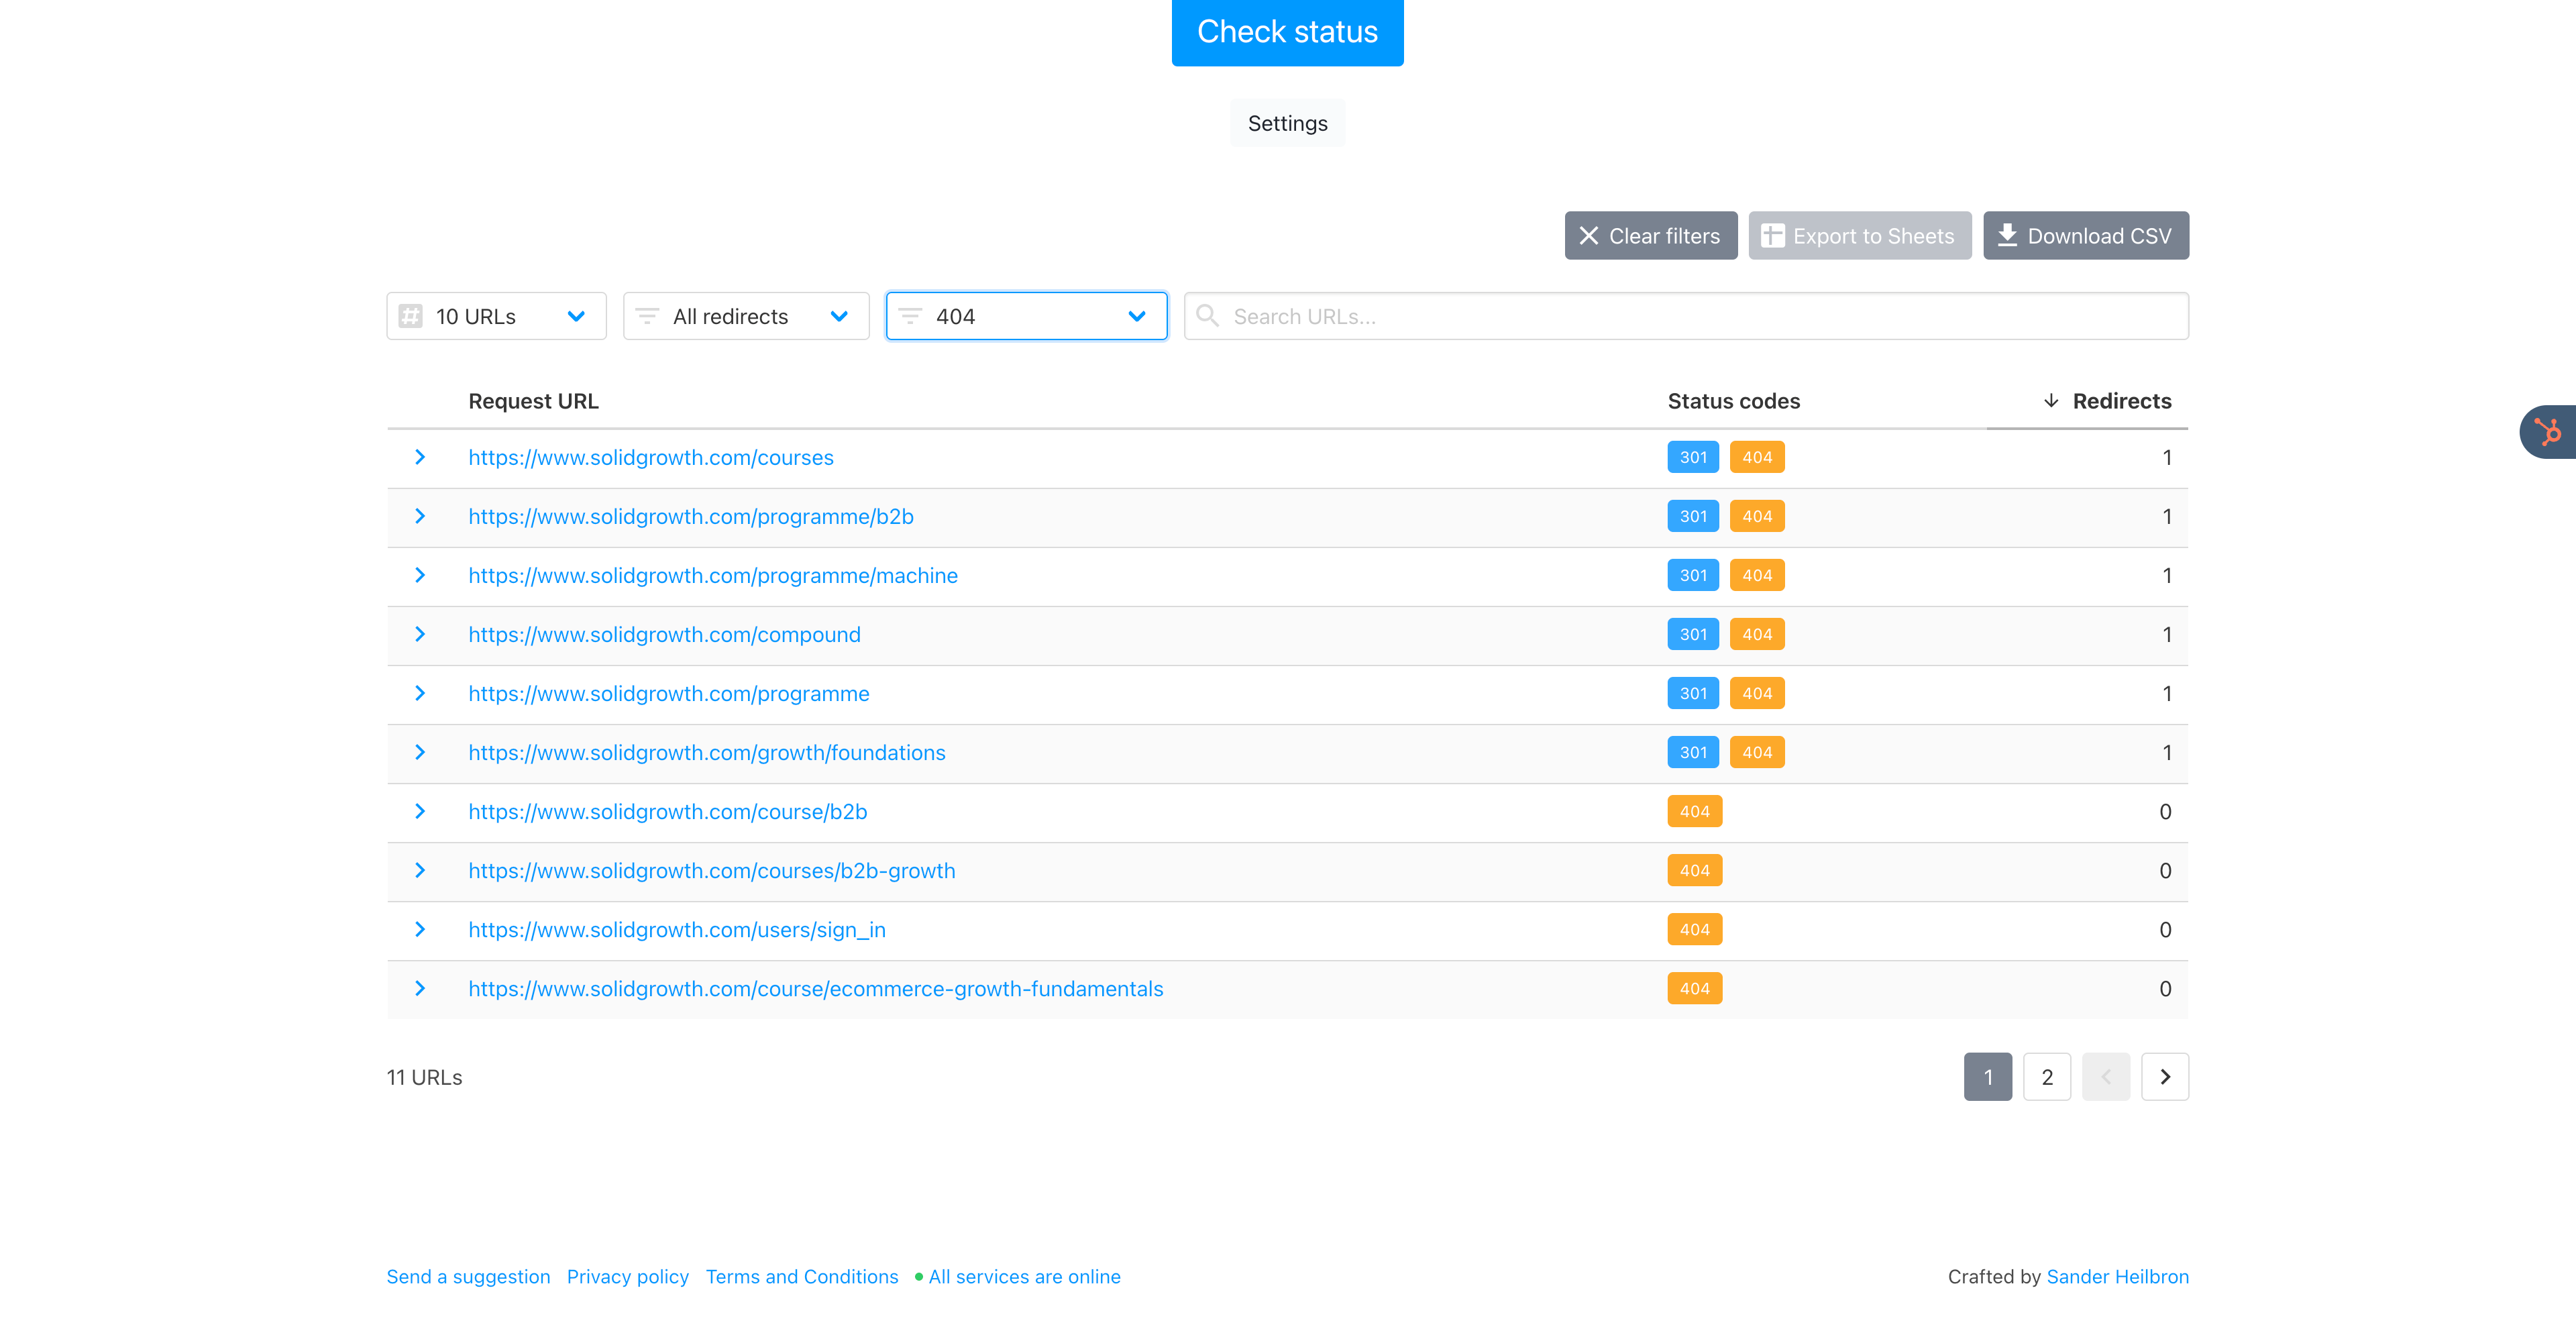
Select Status "404" → Download CSV. This is the list you need to redirect / fix.
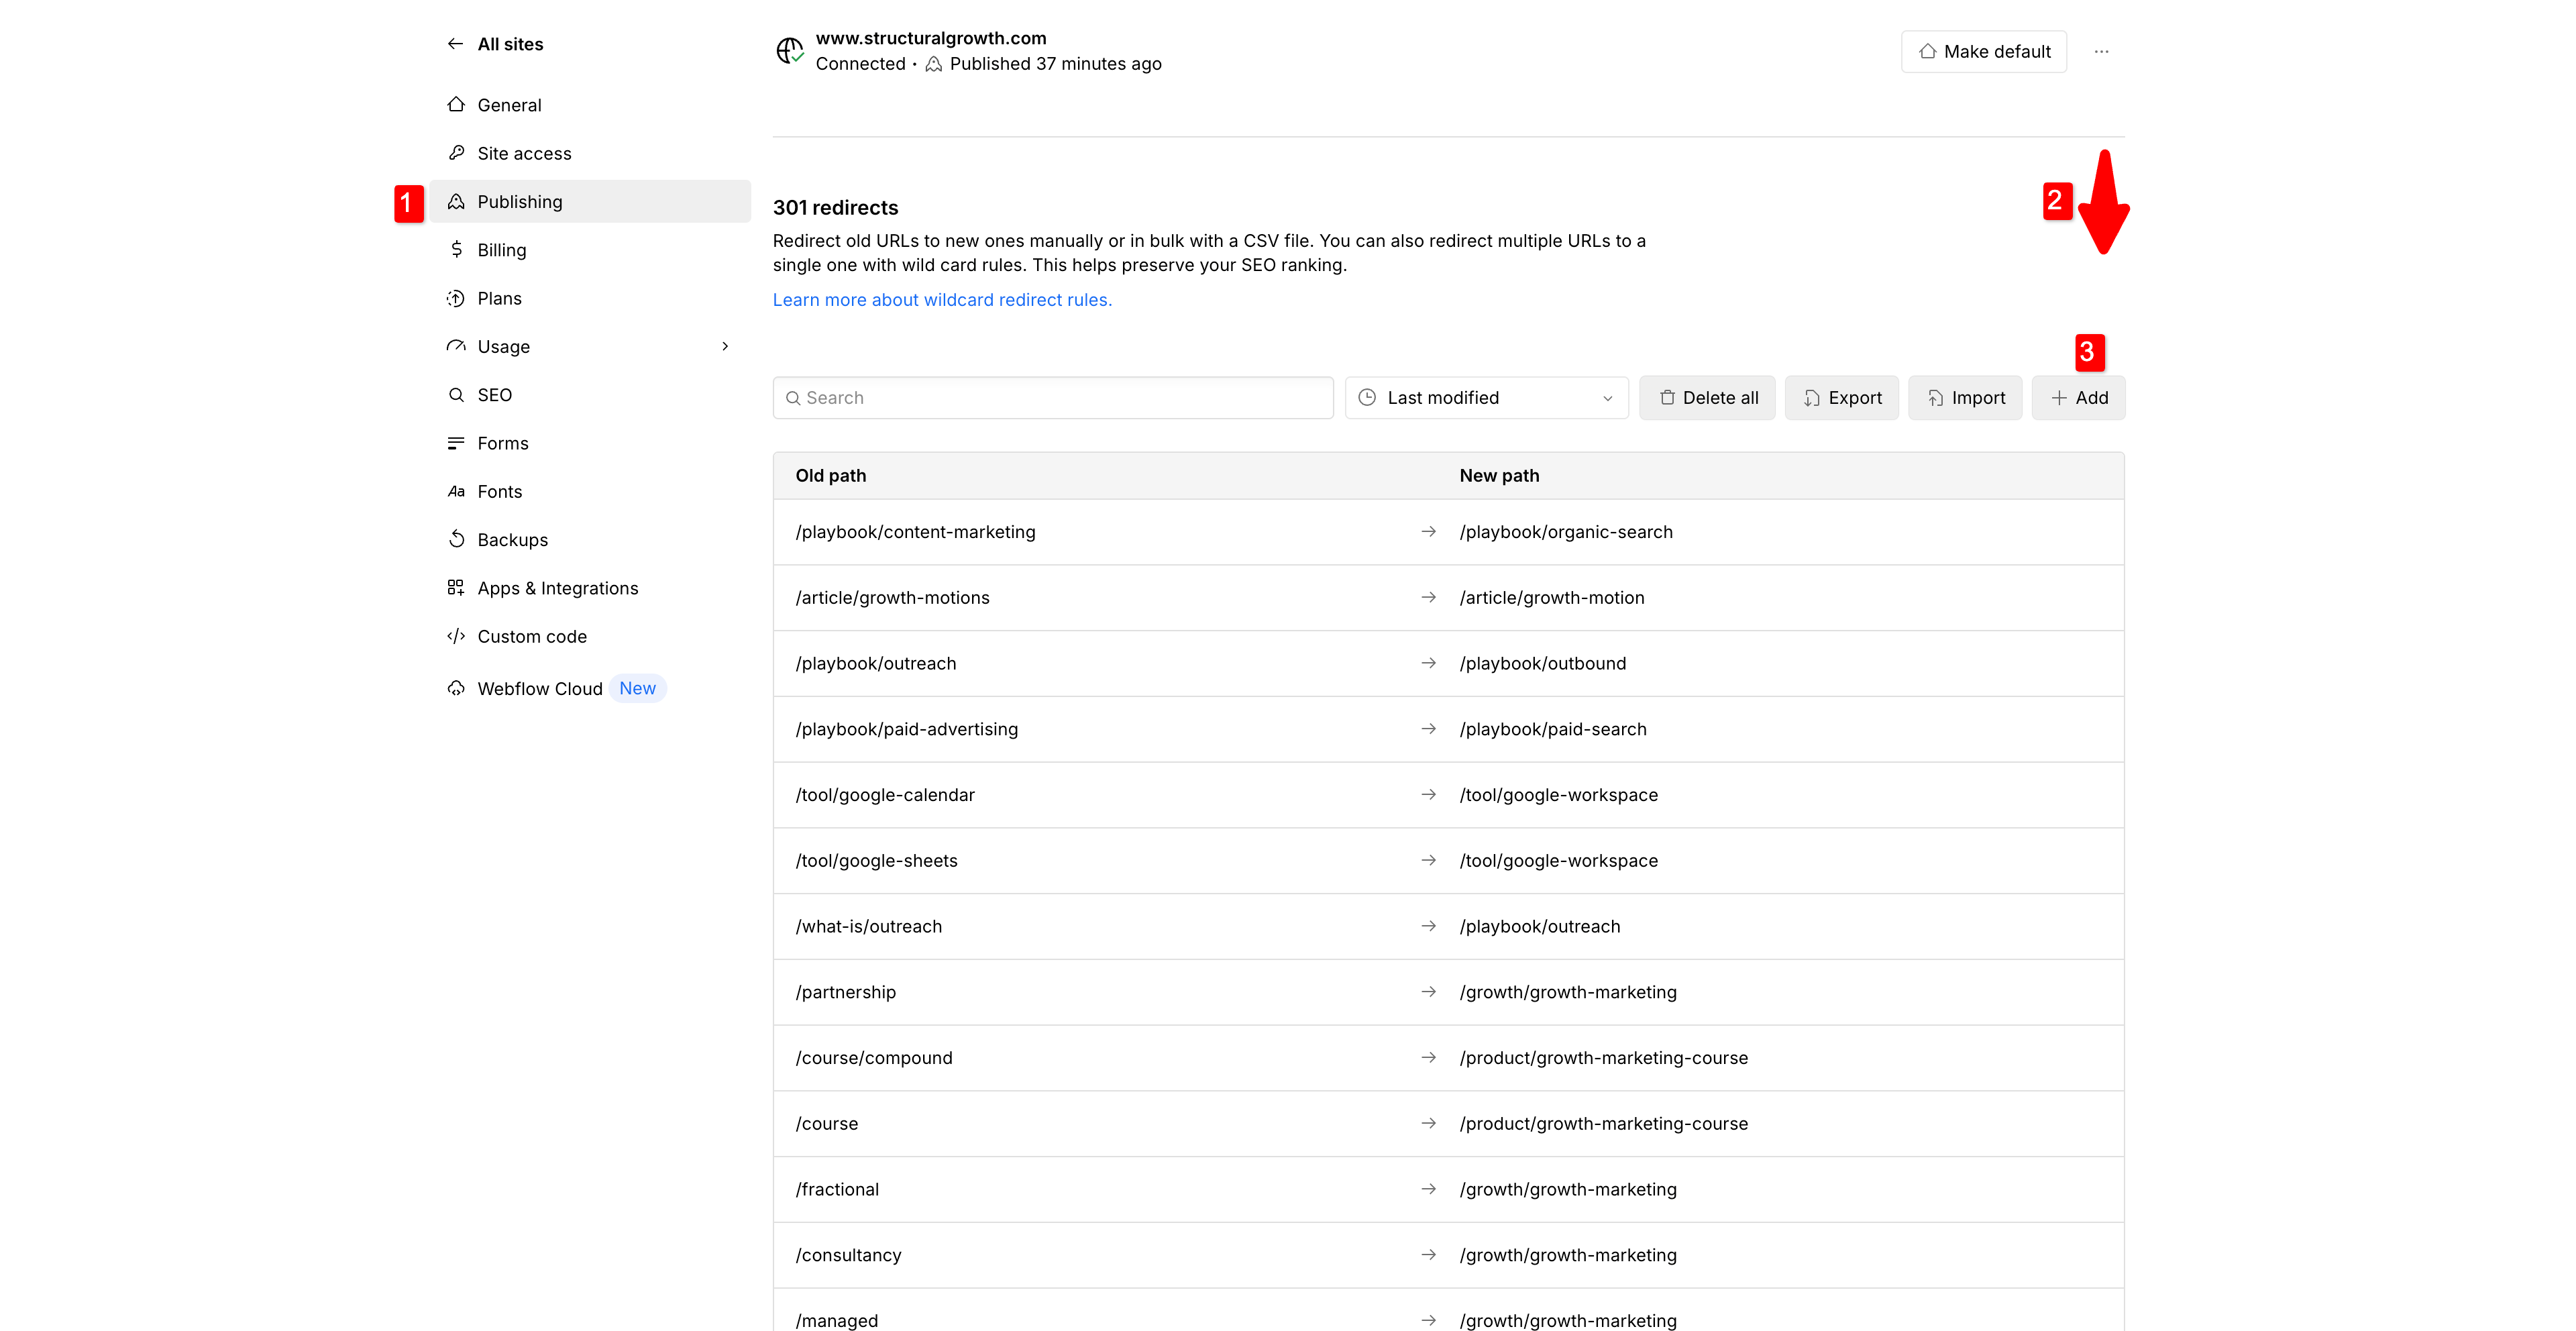
In Webflow go to Settings → Publishing → Scroll all the way down to 301 Redirects. Add each old path in the left column and its live replacement on the right.
Repeat this step for all the broken links from the export. Publish and re-crawl. The next visitor hits the new URL instantly and Google updates its index.
Shorten redirect chains
Even with 404s gone you might have pages that hop twice. Sort the list on number of redirects. If you have more than 1, you can shorten them. Link from the first URL to the last URL, then do the same from the middle to the last.
Apply technical SEO for speed and indexing
Here comes the nerdy part. Most of it happens once, lives in the background and keeps every other optimisation working. We start with llms.txt because it is new and surprisingly easy. After that the tasks shift into classic web hygiene your developer can knock out in a single sprint.
Write your llms.txt file
Large-language-model crawlers read llms.txt much like an intern reads onboarding notes. Give them clear sections, plain descriptions and links that point to public pages only.
Format basics
The file lives in your site root and follows a simple outline.
Keep headings short and group related links under them. Use markdown-style links; LLM crawlers can parse the target plus the anchor text.
Think like a prompt writer
LLMs interpret as well as parse. Write the file as if you were briefing a new hire.
Skip buzzwords. Write “Email sequencer that sends up to 500 personalised emails a day” instead of “cutting-edge engagement solution.”
Give context so the model links concepts correctly. A line such as “This playbook explains outbound prospecting for B2B SaaS” helps the crawler place the guide next to related topics.
Avoid marketing fluff
Do not paste your homepage hero text. Distil the core message: what the product does, who it helps and link to the best explainer page. Plain descriptions stop the model from guessing or hallucinating.
Best practices
Keep the file under 100 KB and encode as UTF-8.
Update whenever you add or retire major pages.
Exclude internal or sensitive URLs.
Treat llms.txt as one helpful signal, not your only route into AI answers.
Publish the file, test that it loads at https://yoursite.com/llms.txt, and your public pages now carry a clear map for every LLM crawler.
Page-speed and Core Web Vitals
Slow sites lose readers and slide down search results. First run your URL through PageSpeed Insights. If mobile load time is over two seconds compress every hero image to WebP, lazy-load pictures below the first screen and remove any unused third-party script. Hand the report to a developer for deeper fixes such as blocking layout shift and improving the largest contentful paint.
HTTPS everywhere
Mixed content breaks padlocks and scares users. Ask your developer to force HTTPS with a site-wide 301 redirect and set the certificate to renew automatically. One change, permanent peace of mind.
XML sitemap
Crawlers find pages faster when you give them a map. Enable Webflow’s auto-generated sitemap, check that new URLs appear, and resubmit it in Google Search Console after any big content push. No code required.
Image optimisation
Heavy images are the main reason otherwise good pages crawl. Export pictures to WebP at around seventy per cent quality, upload at twice the display size for retina screens and let Webflow’s srcset handle the rest. Mobile users will feel the difference immediately.
HTML and CSS hygiene
Dirty code can block rendering. A developer should run the page through the W3C validator, strip unused CSS and defer non-critical JavaScript. These tweaks are invisible to readers yet lift every performance metric.
Mobile friendliness
Over half of organic traffic lands on a phone. Open Chrome DevTools, switch to mobile view and scroll. Fix any sideways overflow, enlarge tap targets that sit too close together and confirm fonts scale cleanly. Small tweaks here often save big bounce-rate headaches.
Run this checklist after a redesign or once per quarter. A few hours of maintenance protect all the ranking and AI visibility gains you earned in the previous steps.
Conclusion
Strong content deserves to be found. By adding clear metadata, setting a clean Open Graph image, dropping in Article schema, building a breadcrumb and linking pages to each other, you give search engines and AI tools everything they need to surface your work. Fixing 404s and flattening redirect chains guards that network, while llms.txt, a fast sitemap and basic speed checks keep the technical ground firm beneath it.
Work through the checklist in the order we covered it. The marketer tasks lift visibility straight away; the developer tweaks make sure those gains stick. When you hit publish on your next guide it will load quickly, look great in every share card and show up where readers search for answers.
With the optimisation box ticked we are ready for the next step: promote each piece so the right people see it first.
Optimise individual pages for target keywords by improving titles, headings, content, and internal links to help search engines understand topic relevance.
Identify search terms your customers use to create content that ranks organically and bid on paid terms that drive qualified traffic at profitable costs.
By clicking “Accept All Cookies”, you agree to the storing of cookies on your device to enhance site navigation, analyze site usage, and assist in our marketing efforts. View our Privacy Policy for more information.


.png)